Posted in Virtual Machine Manager, Windows Server | No Comment | 3,792 views | 15/09/2012 21:45
Hyper-V üzerinde çalışan Linux sanal makineler için olan Linux Integration Services’in 3.4 versiyonu yayınlandı. Yeni sürüm ile birlikte artık Linux sanal sunucularda 4 vCPU’dan fazla vCPU kullanabilmek mümkün hale geldi.
Artık Linux için bir limit bulunmuyor, sanal vCPU limitini artık Hyper-V limitleri belirliyor. Windows Server 2012 ve Hyper-V Server 2012 ile birlikte Linux sanal sunucularınıza 64 vCPU verebilirsiniz. Ayrıca bu sürüm ile birlikte mouse/fare kullanımına tam destek geliyor.
Linux Integration Services v3.4 ile desteklenen Linux dağıtımları:
- Red Hat Enterprise Linux 5.7, 5.8, 6.0-6.3 x86 ve x64
- CentOS 5.7, 5.8, 6.0-6.3 x86 ve x64
Ayrıca IC ile elde edebileceğiniz diğer önemli destekler:
- Hot Add Disk (SCSI Controller üzerinden)
- Time Sync – Saat eşitleme Sentetik Network Adaptörü
- Integrated Shutdown (Sunucu kapatma)
- VLAN tagging (Sentetik network adaptörü üzerinden)
- Live Migration desteği
- Jumbo Frames (1500 bytes üzeri artık kullanılabilir)
Bu sürüm ile hala gelmeyen özellikler:
- Integration services: Volume Snapshot Backup
- Networking: TCP Offload
Hyper-V Linux Integration Services v3.4’ü indirmek için bu linki kullanabilirsiniz.

Posted in Virtual Machine Manager, Windows Powershell, Windows Server | No Comment | 4,983 views | 28/07/2012 16:17
Best Hyper-V Linux Preparation tool SetLinuxvM v4.4 is out!
Changes:
* Fixed “Cannot connect to SCVMM Server” bug of SCVMM 2012 SP1.
* Added native “virtualmachinemanager” cmdlets support for SCVMM 2012 SP1.
* Added Linux Integration Services v3.3 as a default integration service.
* Added console keyboard language support. English is still default language. (Feature request from Jernej Zorko, Thanks!)
* SetLinuxVM no longer resumes operations if root password is not correct. (Feature request from Anonymous, Thanks!)
* Added System Center Config Manager Package Definition File for unattended installations.
* Enhanced installation/uninstallation support with Advanced Installer (Thanks to Advanced Installer!)
Now SetLinuxVM is even more perfect! Please go to official website to download latest version.
Again, thanks for using SetLinuxVM!

Posted in Linux Server, Virtual Machine Manager | No Comment | 7,083 views | 11/01/2011 13:59
You can use CentOS on Hyper-V with 4 vCPU.
!!! PS: EXPERIMENTAL – Just Use This Kernel Source for Test Purposes !!!
1) Install a clean CentOS 5.5 x64 without logical volume
2) Use commands below to update your virtual machine:
1
2
3
4
5
6
7
| cd /usr/src/redhat/RPMS/x86_64/
wget http://www.yusufozturk.info/kernel-2.6.37-hyperv.centos.x86_64.rpm
rpm -ivh kernel-2.6.37-hyperv.centos.x86_64.rpm
mkdir /boot/temp
cd /boot/temp
zcat ../initrd-2.6.37-hyperv.img | cpio -i
nano init |
cd /usr/src/redhat/RPMS/x86_64/
wget http://www.yusufozturk.info/kernel-2.6.37-hyperv.centos.x86_64.rpm
rpm -ivh kernel-2.6.37-hyperv.centos.x86_64.rpm
mkdir /boot/temp
cd /boot/temp
zcat ../initrd-2.6.37-hyperv.img | cpio -i
nano init Check the content below. Remove the bold duplicate lines and save it.
echo “Loading dm-log.ko module”
insmod /lib/dm-log.ko
echo “Loading dm-region-hash.ko module”
insmod /lib/dm-region-hash.ko
echo “Loading dm-region-hash.ko module”
insmod /lib/dm-region-hash.ko
echo Waiting for driver initialization.
stabilized –hash –interval 1000 /proc/scsi/scsi
Continue with commands below.
1
2
3
4
| find . | cpio -c -o > ../initrd
cd ..
gzip -2 < initrd > initrd-2.6.37-hyperv.img
halt |
find . | cpio -c -o > ../initrd
cd ..
gzip -2 < initrd > initrd-2.6.37-hyperv.img
halt After turned off your virtual machine, go to settings and remove Legacy Network Ethernet.
Power on virtual machine. Continue with commands below.
1
2
3
4
5
| cd /etc/sysconfig/network-scripts/
rm -f ifcfg-eth0.bak
cd /etc/sysconfig/networking/devices/
rm -f ifcfg-eth0.bak
halt |
cd /etc/sysconfig/network-scripts/
rm -f ifcfg-eth0.bak
cd /etc/sysconfig/networking/devices/
rm -f ifcfg-eth0.bak
halt Now add Synthetic Network Ethernet and 4 CPU. Power on virtual machine.
(Somehow I got kernel panic on a Centos VM – Please use this kernel as test purposes)

Posted in Linux Server, Virtual Machine Manager | 1 Comment | 10,666 views | 10/01/2011 11:48
Actually you can use Centos with Hyper-V Linux Integration Components. But if you upgrade your kernel, you should re-apply LIC again. So you can try applying new kernel with pre-compiled Hyper-V drivers. But as you know, if you apply custom kernels on Centos, your Centos will be no longer supported. So apply this with your own risk.
1
2
3
4
5
6
7
8
9
10
11
| yum update
yum upgrade kernel
yum install rpm-build redhat-rpm-config ncurses-devel unifdef
cd /home
wget http://www.kernel.org/pub/linux/kernel/v2.6/linux-2.6.37.tar.bz2
tar xjf linux-2.6.37.tar.bz2
ln -s linux-2.6.37 linux
cd /home/linux
make clean && make mrproper
cp /boot/config-`uname -r` ./.config
make menuconfig |
yum update
yum upgrade kernel
yum install rpm-build redhat-rpm-config ncurses-devel unifdef
cd /home
wget http://www.kernel.org/pub/linux/kernel/v2.6/linux-2.6.37.tar.bz2
tar xjf linux-2.6.37.tar.bz2
ln -s linux-2.6.37 linux
cd /home/linux
make clean && make mrproper
cp /boot/config-`uname -r` ./.config
make menuconfig In the menuconfig, you should be careful about 3 things. If not, your new kernel may give kernel panic.
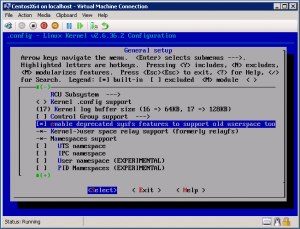
1) First, always enable this feature to eliminate boot failures.
General Setup -> Enable deprecated sysfs features to support old userspace too
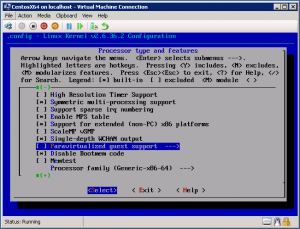
2) Disable paravirtualized guest support to build rpm.
Processor type and features -> Paravirtualized guest support
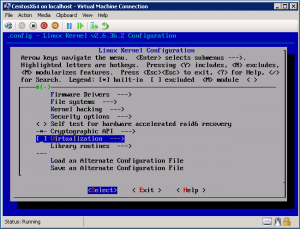
3) Disable Virtualization feature.
Virtualization
Also you can append a version for Hyper-V.
General setup -> Local Version – append to kernel release
You can exit from menuconfig by saving the config. After that do:
nano /home/linux/scripts/package/mkspec |
nano /home/linux/scripts/package/mkspec And append the following lines:
1
2
3
4
5
6
7
8
9
10
11
12
| echo "%post"
echo "if [ \`uname -i\` == \"x86_64\" -o \`uname -i\` == \"i386\" ]; then"
echo " if [ -f /etc/sysconfig/kernel ]; then"
echo " /bin/sed -i -e 's/^DEFAULTKERNEL=kernel-smp$/DEFAULTKERNEL=kernel/' /etc/sysconfig/kernel || exit \$?"
echo " fi"
echo "fi"
echo "/sbin/new-kernel-pkg --package kernel --mkinitrd --depmod --install "$KERNELRELEASE" || exit \$?"
echo ""
echo "%preun"
echo "/sbin/new-kernel-pkg --rminitrd --rmmoddep --remove "$KERNELRELEASE" || exit \$?"
echo "" |
echo "%post"
echo "if [ \`uname -i\` == \"x86_64\" -o \`uname -i\` == \"i386\" ]; then"
echo "  if [ -f /etc/sysconfig/kernel ]; then"
echo "    /bin/sed -i -e 's/^DEFAULTKERNEL=kernel-smp$/DEFAULTKERNEL=kernel/' /etc/sysconfig/kernel || exit \$?"
echo "  fi"
echo "fi"
echo "/sbin/new-kernel-pkg --package kernel --mkinitrd --depmod --install "$KERNELRELEASE" || exit \$?"
echo ""

echo "%preun"
echo "/sbin/new-kernel-pkg --rminitrd --rmmoddep --remove "$KERNELRELEASE" || exit \$?"
echo "" After the changes, you can go with making RPM:
1
2
| cd /home/linux
make CONFIG_DEBUG_SECTION_MISMATCH=y binrpm-pkg 2> make-err.log | tee make-out.log |
cd /home/linux
make CONFIG_DEBUG_SECTION_MISMATCH=y binrpm-pkg 2> make-err.log | tee make-out.log You can find your RPMs in /usr/src/redhat directory.

Posted in Linux Server, Virtual Machine Manager | 13 Comments | 27,149 views | 07/01/2011 23:29
I created a new kernel image for Debian x86 (32 bit). If you have to use 32bit OS for your application needs, you can use this deb packages to upgrade your kernel. Also you will have integrated shutdown feature.
1) Install a clean Debian 5.0.6
2) Do following:
apt-get update
aptitude update
wget -c http://www.yusufozturk.info/linux/linux-image-2.6.36-hyperv-debian.i386.deb
wget -c http://www.yusufozturk.info/linux/linux-headers-2.6.36-hyperv-debian.i386.deb
apt-get install build-essential
dpkg -i linux-image-2.6.36-hyperv-debian.i386.deb linux-headers-2.6.36-hyperv-debian.i386.deb
echo -e "hv_vmbus\nhv_storvsc\nhv_blkvsc\nhv_netvsc" >> /etc/initramfs-tools/modules
update-initramfs –u –k 2.6.36-hyperv |
apt-get update
aptitude update
wget -c http://www.yusufozturk.info/linux/linux-image-2.6.36-hyperv-debian.i386.deb
wget -c http://www.yusufozturk.info/linux/linux-headers-2.6.36-hyperv-debian.i386.deb
apt-get install build-essential
dpkg -i linux-image-2.6.36-hyperv-debian.i386.deb linux-headers-2.6.36-hyperv-debian.i386.deb
echo -e "hv_vmbus\nhv_storvsc\nhv_blkvsc\nhv_netvsc" >> /etc/initramfs-tools/modules
update-initramfs –u –k 2.6.36-hyperv That’s it. Reboot your server with new kernel.

Posted in Linux Server, Virtual Machine Manager | 24 Comments | 45,814 views | 07/01/2011 16:51
If you have a kernel image for your Linux virtual machine, it’s easy to upgrade your kernel for Hyper-V support.
1) Install a clean Debian virtual machine (Use emulated Ethernet card and 1 vCpu)
2) Use commands below to update your virtual machine:
1
2
3
4
5
6
7
8
9
10
11
12
13
14
15
| nano /etc/apt/sources.list (edit your source list if it needs)
apt-get update
aptitude update
apt-get install openssh-server (for ssh support)
apt-get install build-essential
apt-get install ncurses-dev kernel-package fakeroot
apt-get install linux-headers-`uname -r`
apt-get install linux-source-`uname -r | awk -F"-" '{print $1}'`
cd /usr/src
wget -c http://www.kernel.org/pub/linux/kernel/v2.6/linux-2.6.36.tar.bz2
bzip2 -d linux-2.6.36.tar.bz2
tar xf linux-2.6.36.tar
cd linux-2.6.36
cp /boot/config* ./.config
make menuconfig |
nano /etc/apt/sources.list (edit your source list if it needs)
apt-get update
aptitude update
apt-get install openssh-server (for ssh support)
apt-get install build-essential
apt-get install ncurses-dev kernel-package fakeroot
apt-get install linux-headers-`uname -r`
apt-get install linux-source-`uname -r | awk -F"-" '{print $1}'`
cd /usr/src
wget -c http://www.kernel.org/pub/linux/kernel/v2.6/linux-2.6.36.tar.bz2
bzip2 -d linux-2.6.36.tar.bz2
tar xf linux-2.6.36.tar
cd linux-2.6.36
cp /boot/config* ./.config
make menuconfig At menuconfig, go to:
Device Drivers -> Stagging Drivers
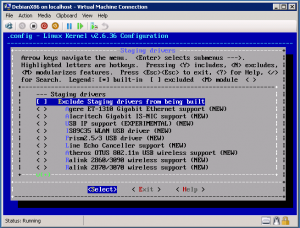
Now choose Microsoft Hyper-V Client Drivers
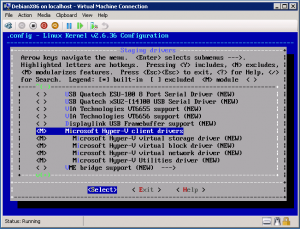
After that you can enter to exit with saving changes.
Use commands below to continue:
1
2
| make-kpkg clean
fakeroot make-kpkg --initrd --append-to-version=-hyperv kernel_image kernel_headers |
make-kpkg clean
fakeroot make-kpkg --initrd --append-to-version=-hyperv kernel_image kernel_headers After this process, you will find your two .deb files in /usr/src directory.
Possible problems:
1) You may get this error when you try to compile kernel.
1
2
3
4
5
6
| This is kernel package version 11.015.
The UTS Release version in include/linux/version.h
""
does not match current version:
"2.6.26-hyperv"
Please correct this. |
This is kernel package version 11.015.
The UTS Release version in include/linux/version.h
""
does not match current version:
"2.6.26-hyperv"
Please correct this. Please check this page to fix this issue:
2) You may get this error when you try to compile kernel.
1
2
3
4
| lguest.c:21:25: error: sys/eventfd.h: No such file or directory
lguest.c: In function ‘create_thread’:
lguest.c:1021: warning: implicit declaration of function ‘eventfd’
make: *** [lguest] Error 1 |
lguest.c:21:25: error: sys/eventfd.h: No such file or directory
lguest.c: In function ‘create_thread’:
lguest.c:1021: warning: implicit declaration of function ‘eventfd’
make: *** [lguest] Error 1 Please check this page to fix this issue:
If you get different problems, please report to me.
|


