Posted in
Exchange Server |
32 Comments | 36,622 views | 01/09/2010 21:30
Last parts of guide, I configured Exchange server roles. We have 2 Mailbox + CAS Servers and 2 Hub Transport servers. I made load balanced CAS servers and Hub Transport server with Citrix Netscaler Hardware Load Balancer. Now this part I’ll configure CAS arrays, IMAP, POP and SMTP services. Also I’ll show you configuration of Forefront Protection 2010 for Exchange Server.
First of all, go to EXCAS01 and create a new CAS array.
New-ClientAccessArray -Fqdn "exchange.radore.com.tr" -Site "Default-First-Site-Name" |
New-ClientAccessArray -Fqdn "exchange.radore.com.tr" -Site "Default-First-Site-Name"
See Client Access Array:
Get-ClientAccessArray | fl * |
Get-ClientAccessArray | fl *
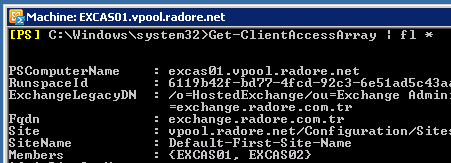
Assign DAG databases to new Client Access Array:
Get-MailboxDatabase | Set-MailboxDatabase -RPCClientAccessServer “exchange.radore.com.tr” |
Get-MailboxDatabase | Set-MailboxDatabase -RPCClientAccessServer “exchange.radore.com.tr”
Okay, we created our CAS array and assigned a database to it. Now we should configure POP and IMAP settings for client access.
Go to EXCAS01 and set Pop settings:
Set-PopSettings -LoginType PlainTextLogin |
Set-PopSettings -LoginType PlainTextLogin
Set-PopSettings -ExternalConnectionSettings 'exchange.radore.com.tr:995:SSL','exchange.radore.com.tr:110:TLS' |
Set-PopSettings -ExternalConnectionSettings 'exchange.radore.com.tr:995:SSL','exchange.radore.com.tr:110:TLS'
See POP settings:
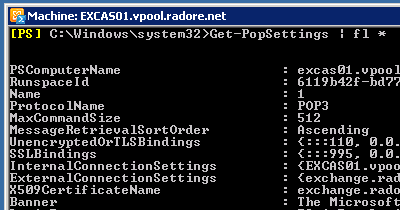
Set IMAP settings:
Set-ImapSettings -LoginType PlainTextLogin |
Set-ImapSettings -LoginType PlainTextLogin
Set-ImapSettings -ExternalConnectionSettings 'exchange.radore.com.tr:993:SSL','exchange.radore.com.tr:143:TLS' |
Set-ImapSettings -ExternalConnectionSettings 'exchange.radore.com.tr:993:SSL','exchange.radore.com.tr:143:TLS'
See IMAP settings:
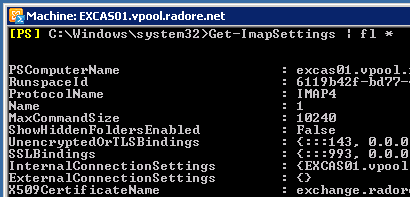
We use PlainTextLogin because you can’t get Authenticated with SecureLogin in Hosted Exchange environment. So you should use PlainTextLogin. But don’t worry, we use Citrix Netscaler to secure connection.
Also we should configure Outlook access. First install RPC over HTTP:
ServerManagerCmd -i RPC-over-HTTP-proxy |
ServerManagerCmd -i RPC-over-HTTP-proxy
Then configure Outlook Anywhere:
Enable-OutlookAnywhere -ExternalHostname exchange.radore.com.tr -DefaultAuthenticationMethod:Basic -SSLOffloading $False |
Enable-OutlookAnywhere -ExternalHostname exchange.radore.com.tr -DefaultAuthenticationMethod:Basic -SSLOffloading $False
You can see your Outlook Anywhere configuration:
Get-OutlookAnywhere | fl * |
Get-OutlookAnywhere | fl *
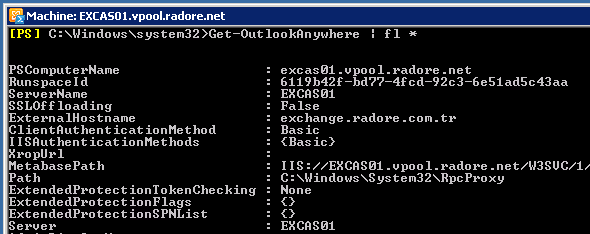
You should change Autodiscover External URL:
Set-AutodiscoverVirtualDirectory -Identity 'autodiscover (default Web site)' -ExternalURL 'https://exchange.radore.com.tr/autodiscover' -InternalURL 'https://exchange.radore.com.tr/autodiscover' -BasicAuthentication $true |
Set-AutodiscoverVirtualDirectory -Identity 'autodiscover (default Web site)' -ExternalURL 'https://exchange.radore.com.tr/autodiscover' -InternalURL 'https://exchange.radore.com.tr/autodiscover' -BasicAuthentication $true
Change OAB virtual directory external URL:
Set-OABVirtualDirectory -Identity "EXCAS01\OAB (Default Web Site)" -ExternalUrl 'https://exchange.radore.com.tr/OAB' -InternalURL 'https://exchange.radore.com.tr/OAB' -BasicAuthentication $true |
Set-OABVirtualDirectory -Identity "EXCAS01\OAB (Default Web Site)" -ExternalUrl 'https://exchange.radore.com.tr/OAB' -InternalURL 'https://exchange.radore.com.tr/OAB' -BasicAuthentication $true
Change Web services virtual directory external URL:
Set-WebServicesVirtualDirectory -Identity "EXCAS01\EWS (default Web site)" -BasicAuthentication $true -ExternalUrl 'https://exchange.radore.com.tr/EWS/exchange.asmx' -InternalUrl 'https://exchange.radore.com.tr/EWS/exchange.asmx' |
Set-WebServicesVirtualDirectory -Identity "EXCAS01\EWS (default Web site)" -BasicAuthentication $true -ExternalUrl 'https://exchange.radore.com.tr/EWS/exchange.asmx' -InternalUrl 'https://exchange.radore.com.tr/EWS/exchange.asmx'
We finished changes on POP, IMAP and Outlook Anywhere. Don’t forget to do same steps on EXCAS02. Now it’s time to configure SMTP. Now go back to EXGW01 and EXGW02.
Configure EXGW01 Receive Connector for Outlook Authentication:
Get-ReceiveConnector 'EXGW01\EXGW01 SMTP' | Set-ReceiveConnector -PermissionGroups 'AnonymousUsers','ExchangeUsers','ExchangeServers' |
Get-ReceiveConnector 'EXGW01\EXGW01 SMTP' | Set-ReceiveConnector -PermissionGroups 'AnonymousUsers','ExchangeUsers','ExchangeServers'
Also configure Inbound SMTP Array for Outlook Authentication:
Get-ReceiveConnector 'EXGW01\Inbound SMTP Array' | Set-ReceiveConnector -PermissionGroups 'AnonymousUsers','ExchangeUsers','ExchangeServers' |
Get-ReceiveConnector 'EXGW01\Inbound SMTP Array' | Set-ReceiveConnector -PermissionGroups 'AnonymousUsers','ExchangeUsers','ExchangeServers'
Configure Encryption on Receive Connectors:
Get-ReceiveConnector 'EXGW01\EXGW01 SMTP' | Set-ReceiveConnector -AuthMechanism 'Tls','Integrated','BasicAuth' |
Get-ReceiveConnector 'EXGW01\EXGW01 SMTP' | Set-ReceiveConnector -AuthMechanism 'Tls','Integrated','BasicAuth'
Get-ReceiveConnector 'EXGW01\Inbound SMTP Array' | Set-ReceiveConnector -AuthMechanism 'Tls','Integrated','BasicAuth' |
Get-ReceiveConnector 'EXGW01\Inbound SMTP Array' | Set-ReceiveConnector -AuthMechanism 'Tls','Integrated','BasicAuth'
Also you should change binded ip address of Inbound SMTP Array.
But first you should remove old ones:
Get-ReceiveConnector 'EXGW01\Default *' | Remove-ReceiveConnector
Get-ReceiveConnector 'EXGW02\Default *' | Remove-ReceiveConnector
Get-ReceiveConnector 'EXGW01\Client *' | Remove-ReceiveConnector
Get-ReceiveConnector 'EXGW02\Client *' | Remove-ReceiveConnector |
Get-ReceiveConnector 'EXGW01\Default *' | Remove-ReceiveConnector
Get-ReceiveConnector 'EXGW02\Default *' | Remove-ReceiveConnector
Get-ReceiveConnector 'EXGW01\Client *' | Remove-ReceiveConnector
Get-ReceiveConnector 'EXGW02\Client *' | Remove-ReceiveConnector
Now see the Receive Connectors:
Get-ReceiveConnector | fl * |
Get-ReceiveConnector | fl *

Get-ReceiveConnector 'EXGW01\Inbound SMTP Array' | Set-ReceiveConnector -Bindings '0.0.0.0:25','0.0.0.0:587' |
Get-ReceiveConnector 'EXGW01\Inbound SMTP Array' | Set-ReceiveConnector -Bindings '0.0.0.0:25','0.0.0.0:587'
Do same thing for EXGW02:
Get-ReceiveConnector 'EXGW02\Inbound SMTP Array' | Set-ReceiveConnector -Bindings '0.0.0.0:25','0.0.0.0:587' |
Get-ReceiveConnector 'EXGW02\Inbound SMTP Array' | Set-ReceiveConnector -Bindings '0.0.0.0:25','0.0.0.0:587'
Now lets check again:
Get-ReceiveConnector | fl * |
Get-ReceiveConnector | fl *

Go back to Citrix Netscaler and configure services for IMAP, POP and RPC:

Also configure virtual servers:

Be sure to choose SOURCEIP for load balancing. After this, you can start to test POP3 and IMAP connection via Outlook. You shouldn’t choose any encryption method like TLS or SSL because of Hosted Exchange AD structure. Now I’ll show you how to configure Forefront Protection 2010. I installed Forefront on EXGW01 and EXGW02.
Enable connection filtering:

Enable DNSBL checking:

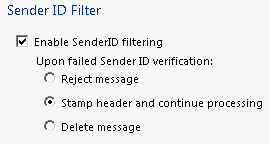
Enable SenderID and leave “Stamp header” option:
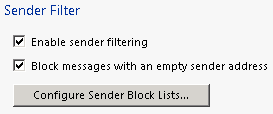
Enable Sender Filter:
Enable Receipent Filtering:

Enable Backscatter:

Enable Content Filter:

Configure SCL:

You can leave default other options and services of Forefront Protection. I finished this part. Next part, I’ll show you how to create organizations and users. But if you did exact same steps with me, that means you have a fully working Hosted Exchange 2010.


