Posted in
Exchange Server |
6 Comments | 24,490 views | 31/08/2010 12:13
At Part 3, We configured OWA service and SSL certificate. This part, we will configure our 2 Hub Transport servers, EXGW01 and EXGW02. I’ll use Citrix Netscaler again to make a load balance between them.
Now on EXGW01, open Exchange Management Shell and execute;
New-ReceiveConnector -Name 'Inbound SMTP Array' -Usage 'Custom' -Bindings '94.101.92.2:25','94.101.92.2:587' -Fqdn 'mail.radore.com.tr' -RemoteIPRanges '0.0.0.0-255.255.255.255' -Server 'EXGW01' |
New-ReceiveConnector -Name 'Inbound SMTP Array' -Usage 'Custom' -Bindings '94.101.92.2:25','94.101.92.2:587' -Fqdn 'mail.radore.com.tr' -RemoteIPRanges '0.0.0.0-255.255.255.255' -Server 'EXGW01'
Do same thing on EXGW02:
New-ReceiveConnector -Name 'Inbound SMTP Array' -Usage 'Custom' -Bindings '94.101.92.2:25','94.101.92.2:587' -Fqdn 'mail.radore.com.tr' -RemoteIPRanges '0.0.0.0-255.255.255.255' -Server 'EXGW02' |
New-ReceiveConnector -Name 'Inbound SMTP Array' -Usage 'Custom' -Bindings '94.101.92.2:25','94.101.92.2:587' -Fqdn 'mail.radore.com.tr' -RemoteIPRanges '0.0.0.0-255.255.255.255' -Server 'EXGW02'
Use Get-ReceiveConnector to see recently added connectors:
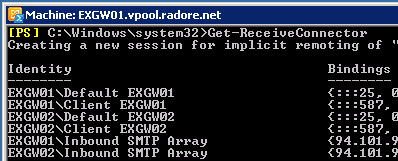
Enable receive connectors to get mail from external mail address:
Get-ReceiveConnector "Inbound *" | Set-ReceiveConnector -PermissionGroups:AnonymousUsers,ExchangeUsers,ExchangeServers |
Get-ReceiveConnector "Inbound *" | Set-ReceiveConnector -PermissionGroups:AnonymousUsers,ExchangeUsers,ExchangeServers
Disable default receive connectors:
1
2
3
4
| 'EXGW01\Default *' | Set-ReceiveConnector -Enabled $false
'EXGW02\Default *' | Set-ReceiveConnector -Enabled $false
'EXGW01\Client *' | Set-ReceiveConnector -Enabled $false
'EXGW02\Client *' | Set-ReceiveConnector -Enabled $false |
'EXGW01\Default *' | Set-ReceiveConnector -Enabled $false
'EXGW02\Default *' | Set-ReceiveConnector -Enabled $false
'EXGW01\Client *' | Set-ReceiveConnector -Enabled $false
'EXGW02\Client *' | Set-ReceiveConnector -Enabled $false
Now add new receive connectors for EXGW01 and EXGW02:
New-ReceiveConnector -Name 'EXGW01 SMTP' -Usage 'Custom' -Bindings '94.101.92.3:25','94101.92.3:587' -Fqdn 'mail.radore.com.tr' -RemoteIPRanges '0.0.0.0-255.255.255.255' -Server 'EXGW01' |
New-ReceiveConnector -Name 'EXGW01 SMTP' -Usage 'Custom' -Bindings '94.101.92.3:25','94101.92.3:587' -Fqdn 'mail.radore.com.tr' -RemoteIPRanges '0.0.0.0-255.255.255.255' -Server 'EXGW01'
New-ReceiveConnector -Name 'EXGW02 SMTP' -Usage 'Custom' -Bindings '94.101.92.4:25','94101.92.4:587' -Fqdn 'mail.radore.com.tr' -RemoteIPRanges '0.0.0.0-255.255.255.255' -Server 'EXGW02' |
New-ReceiveConnector -Name 'EXGW02 SMTP' -Usage 'Custom' -Bindings '94.101.92.4:25','94101.92.4:587' -Fqdn 'mail.radore.com.tr' -RemoteIPRanges '0.0.0.0-255.255.255.255' -Server 'EXGW02'
Configure load balancing on Citrix Netscaler. First add service definition as TCP – 25 for EXGW01.

Add same service definition for EXGW02 and Create a Virtual Server:

Choose Least Connection as LB Method:

Now telnet your NLB ip and you should see your FQDN:

Ok, now lets create a send connector to send mails to external address:
New-SendConnector -Name 'Exchange Gateway' -Usage 'Custom' -AddressSpaces 'SMTP:*;1' -DNSRoutingEnabled $true -UseExternalDNSServersEnabled $false -Fqdn 'mail.radore.com.tr' -SourceTransportServers 'EXGW01','EXGW02' |
New-SendConnector -Name 'Exchange Gateway' -Usage 'Custom' -AddressSpaces 'SMTP:*;1' -DNSRoutingEnabled $true -UseExternalDNSServersEnabled $false -Fqdn 'mail.radore.com.tr' -SourceTransportServers 'EXGW01','EXGW02'

Create a SSL request for EXGW01:
New-ExchangeCertificate -FriendlyName 'mail.radore.com.tr' -GenerateRequest -PrivateKeyExportable $true -KeySize '2048' -SubjectName 'C=TR,S="Metrocity",L="Istanbul",O="Radore Hosting",OU="IT",CN=mail.radore.com.tr' -DomainName 'mail.radore.com.tr','autodiscover.radore.com.tr','EXCAS01','EXCAS02','EXGW01','EXGW02' -Server 'EXGW01' |
New-ExchangeCertificate -FriendlyName 'mail.radore.com.tr' -GenerateRequest -PrivateKeyExportable $true -KeySize '2048' -SubjectName 'C=TR,S="Metrocity",L="Istanbul",O="Radore Hosting",OU="IT",CN=mail.radore.com.tr' -DomainName 'mail.radore.com.tr','autodiscover.radore.com.tr','EXCAS01','EXCAS02','EXGW01','EXGW02' -Server 'EXGW01'
Buy your commercial certificate and save certificate code to C:\cert.txt.
Import your certificate on EXGW01:
Import-ExchangeCertificate -FileData ([Byte[]]$(Get-Content -Path C:\Cert.txt -Encoding byte -ReadCount 0)) -Password:(Get-Credential).password |
Import-ExchangeCertificate -FileData ([Byte[]]$(Get-Content -Path C:\Cert.txt -Encoding byte -ReadCount 0)) -Password:(Get-Credential).password

Assign SMTP services to certificate. Don’t forget to use your own Thumbprint.
Enable-ExchangeCertificate -Server 'EXGW01' -Services 'SMTP' -Thumbprint '5C9F5C946CAC544F054D24' |
Enable-ExchangeCertificate -Server 'EXGW01' -Services 'SMTP' -Thumbprint '5C9F5C946CAC544F054D24'

We will export our certificate and import it to second Hub Transport server, EXGW02.
1
2
| $File = Export-ExchangeCertificate -Thumbprint '5C931E54FDA054D24' -BinaryEncoded:$true -Password (Get-Credential).password
Set-Content -Path "C:\htcert2.pfx" -Value $File.FileData -Encoding Byte |
$File = Export-ExchangeCertificate -Thumbprint '5C931E54FDA054D24' -BinaryEncoded:$true -Password (Get-Credential).password
Set-Content -Path "C:\htcert2.pfx" -Value $File.FileData -Encoding Byte

Now, transfer your pfx file to EXGW02 and import it:
Import-ExchangeCertificate -FileData ([Byte[]]$(Get-Content -Path c:\htcert2.pfx -Encoding Byte -ReadCount 0)) -Password:(Get-Credential).password -PrivateKeyExportable $true |
Import-ExchangeCertificate -FileData ([Byte[]]$(Get-Content -Path c:\htcert2.pfx -Encoding Byte -ReadCount 0)) -Password:(Get-Credential).password -PrivateKeyExportable $true

Enable SMTP service for EXGW02:
Enable-ExchangeCertificate -Server 'EXGW02' -Services 'SMTP' -Thumbprint '03BB616D714D03B9476' |
Enable-ExchangeCertificate -Server 'EXGW02' -Services 'SMTP' -Thumbprint '03BB616D714D03B9476'

Go to Citrix Netscaler again and create a Virtual Server for SMTP.
Choose SSL as protocol and 443 as port number.

Configure LB method as Least Connection.
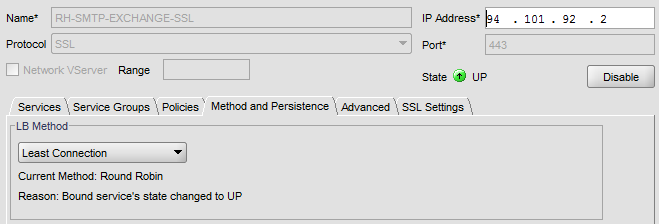
Check Hosted Exchange 2010 Setup Guide Part 3 for how to import SSL Certificate to Citrix:
Bind SSL certificate to virtual server.

Also you can add HTTP, 80 as another Virtual Server.
Please follow Hosted Exchange 2010 Part 3 for how to add HTTP 80 Virtual Server.
Go to EXGW01 and EXGW02, open IIS manager (inetmgr) and navigate to SSL Security for Default Web Site.
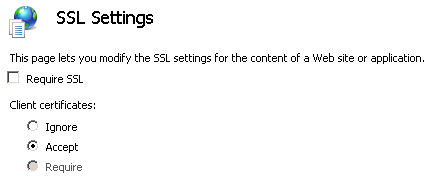
Clear “Require SSL” and click Accept from SSL settings.
Now test your Exchange Server 2010 SMTP address:
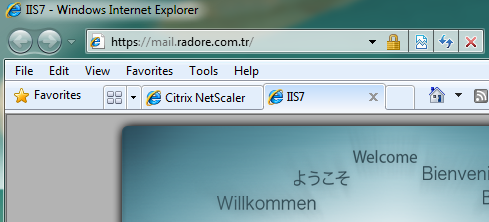
Wadaaaa again! We finished Citrix Netscaler Load Balancing for Hub Transport Servers.
Next Part, We will see how to configure Forefront Protection 2010 for Exchange Servers.
Thanks for reading.
Please continue with Part 5:
Hosted Exchange 2010 – Hosted Exchange 2010 Installation


