Categories

Sponsors

Archive
 Blogroll

Badges

Community

|

Posted in Exchange Server, Windows Powershell | No Comment | 5,092 views | 30/06/2011 23:47
Hello,
You can use this script as a function to prepare Active Directory for HE 2010.
1
2
3
4
5
6
7
8
9
10
11
12
13
14
15
16
17
18
19
20
21
22
23
24
25
26
27
28
29
30
31
32
33
34
35
36
37
38
39
40
41
42
43
44
45
46
47
48
| $ErrorCode = $Null
Import-Module ServerManager
$ADStatus = (Get-WindowsFeature RSAT-ADDS).Installed
If ($ADStatus -ne $True)
{
Write-Warning "You should install Active Directory Administration Tools (RSAT-ADDS)"
Write-Host " "
Write-Warning "Aborting.."
Start-Sleep 3
$ErrorCode = "500"
}
If ($ErrorCode -eq $Null)
{
Write-Host " "
$OrganizationName = Read-Host "Organization Name"
Write-Host " "
$CurrentLocation = (Get-Location).Path
$SetupFile = $CurrentLocation + "\setup.com"
If (!(Test-Path -Path $SetupFile))
{
$SetupFilePath = Read-Host "Setup File Path"
$SetupFile = $SetupFilePath + "\setup.com"
If (!(Test-Path -Path $SetupFile))
{
Write-Warning "Could not find setup.com file."
Write-Host " "
Write-Warning "Aborting.."
Start-Sleep 3
$ErrorCode = "550"
}
}
}
If ($ErrorCode -eq $Null)
{
&"$SetupFile" /PrepareAD /OrganizationName:$OrganizationName /hosting
Write-Host " "
Write-Host "AD preparation completed successfully."
Start-Sleep 3
$PrepareADStatus = "Completed"
}
else
{
$PrepareADStatus = "Failed"
} |
$ErrorCode = $Null
Import-Module ServerManager
$ADStatus = (Get-WindowsFeature RSAT-ADDS).Installed

If ($ADStatus -ne $True)
{
	Write-Warning "You should install Active Directory Administration Tools (RSAT-ADDS)"
	Write-Host " "
	Write-Warning "Aborting.."
	Start-Sleep 3
	$ErrorCode = "500"
}

If ($ErrorCode -eq $Null)
{
	Write-Host " "
	$OrganizationName = Read-Host "Organization Name"
	Write-Host " "
	$CurrentLocation = (Get-Location).Path
	$SetupFile = $CurrentLocation + "\setup.com"
	If (!(Test-Path -Path $SetupFile))
	{
		$SetupFilePath = Read-Host "Setup File Path"
		$SetupFile = $SetupFilePath + "\setup.com"

		If (!(Test-Path -Path $SetupFile))
		{
			Write-Warning "Could not find setup.com file."
			Write-Host " "
			Write-Warning "Aborting.."
			Start-Sleep 3
			$ErrorCode = "550"
		}
	}
}

If ($ErrorCode -eq $Null)
{
	&"$SetupFile" /PrepareAD /OrganizationName:$OrganizationName /hosting
	Write-Host " "
	Write-Host "AD preparation completed successfully."
	Start-Sleep 3
	$PrepareADStatus = "Completed"
}
else
{
	$PrepareADStatus = "Failed"
} Setup.com stores in Exchange 2010 SP1 DVD.

Posted in Exchange Server, Windows Powershell | 7 Comments | 11,721 views | 30/06/2011 23:05
Hello,
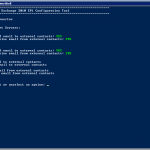
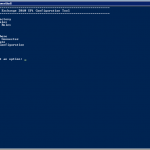
I’m happy to pronounce my new Powershell tool. I’m sure that will help who wants to install Hosted Exchange.
Functionalities:
1) Prepare Active Directory: Prepares existing active directory to install Hosted Exchange 2010 SP1.
2) Install Exchange Roles: Helps you to install Exchange roles unattended.
3) Uninstall Exchange Roles: Helps you to uninstall Exchanges roles which you don’t need anymore.
4) Setup Exchange DAG: Sets up Exchange DAG, Witness Directory and IP/Subnet Configuration for Cluster.
5) Setup CAS Array: Creates Client Access Arrays, helps you to assign members
6) Setup Outlook Anywhere: Enables Outlook Anywhere and configures RPC service.
7) Setup Receive/Send Connector: Helps you to configure Hub Transport servers.
8) Setup SSL Certificate: Helps you to create CSR, Import/Export SSL Certificates and assign services
9) Virtual Directory Configuration: Checks the virtual directories and fix them if they are not default.
Download:
Donate: Thanks to support this open source project!
Usage:
1. First, you should allow signed Powershell scripts:
Set-ExecutionPolicy AllSigned |
Set-ExecutionPolicy AllSigned 2. Go to directory and execute start.ps1:
Sponsor: Applied Innovations


Posted in Virtual Machine Manager, Windows Powershell | 4 Comments | 14,379 views | 29/05/2011 16:19
Hello,
Update: SetLinuxVM is now under GPLv2
After number of bug fixes, improvements and new functionalities, Set-LinuxVM reached version 2.3 stable.
Fixed bugs:
1) Keyboard language fix. There is no dependency on VM keyboard language anymore.
2) Changed logic of LIC installation.
3) Network service restart bug in Redhat based distributions.
New functionalities:
1) Extending Logical Volume: If you expand VM’s disk, you can extend / partition to maximum free space.
2) Changing root password: You can change password of root users.
3) Changing time zone: You can change time zone of linux vm.
4) SCVMM template support: You can set distro, username and password informations into Linux VM template. If you provision a Linux VM from that template, Set-LinuxVM checks template fields to get required distro, username and password informations.
5) CloudLinux distribution support. Now supported distros: CentOS, Fedora, Debian, Ubuntu, Redhat, Suse and CloudLinux
6) Parallels Plesk Panel installation support. Now supported control panels: CPanel and Plesk
7) Advanced verify and debug process.
8) Secured with Code Signing Certificate from GlobalSign.
9) Automatic updates: Script checks new updates so you don’t need to download new versions anymore.
Other functionalities:
1) Unattended IP, Hostname and DNS configuration for Linux VMs.
2) Automatic Linux integration components installation.
3) Multi Distro Support: Debian, Ubuntu, Centos, Fedora, Redhat, Suse and CloudLinux!
4) Automatic CPanel and Parallels Plesk installation.
5) Linux VM Template support
6) Hyper-V support! You don’t need SCVMM to use this script.
7) Multiple Hyper-V and SCVMM host support.
8) Automatic Emulated NIC to Synthetic NIC support.
9) No need to internet connection (SSH access etc.) or additional changes on VM.
10) Custom Answer File support! You can execute your own scripts.
Copyright (C) 2012 Yusuf Ozturk
This program is free software; you can redistribute it and/or modify it under the terms of the GNU General Public License as published by the Free Software Foundation; either version 2 of the License, or (at your option) any later version.
This program is distributed in the hope that it will be useful, but WITHOUT ANY WARRANTY; without even the implied warranty of MERCHANTABILITY or FITNESS FOR A PARTICULAR PURPOSE. See the GNU General Public License for more details.
You should have received a copy of the GNU General Public License along with this program; if not, write to the Free Software Foundation, Inc., 59 Temple Place, Suite 330, Boston, MA 02111-1307 USA Download:
Donate: Thanks to support this open source project!
Usage:
1. First, you should allow signed Powershell scripts:
Set-ExecutionPolicy AllSigned |
Set-ExecutionPolicy AllSigned 2. Extract file and move “SetLinuxVM” directory under to “C:\Windows\System32\WindowsPowerShell\v1.0\Modules”.
3. Import as a module:
4. That’s it. To see how to use it:
Get-help Set-LinuxVM -full |
Get-help Set-LinuxVM -full 5. Follow to instructions.
How to create Linux VM template for Set-LinuxVM:
Sponsor: Applied Innovations


Posted in Virtual Machine Manager, Windows Powershell | 6 Comments | 18,303 views | 15/05/2011 23:36
Hello,
I’ve announced a new functionality for Linux virtual machines on Hyper-V a few days ago. I called it “Set-LinuxVM”.
What you can do with “Set-LinuxVM”:
1) Unattended IP, Hostname and DNS configuration for Linux VMs.
2) Automatic Linux integration components installation.
3) Multi Distro Support: Debian, Ubuntu, Centos, Fedora, Redhat and Suse!
4) Automatic CPanel installation for Redhat and Centos
5) Linux VM Template support (Use Skip for EnableLIC switch)
6) Hyper-V support! You don’t need SCVMM to use this script.
7) Multiple Hyper-V and SCVMM host support.
8) Automatic Emulated NIC to Synthetic NIC support.
9) No need to internet connection (SSH access etc.) or additional changes on VM.
10) Custom Answer File support! You can execute your own scripts.
Download:
Usage:
1. First, you should disable Execution policy:
Set-ExecutionPolicy Unrestricted |
Set-ExecutionPolicy Unrestricted PS: I’m looking for a way to assign this script with a commercial certificate.
2. Extract file and move “SetLinuxVM” directory under to “C:\Windows\System32\WindowsPowerShell\v1.0\Modules”.
3. Import as a module:
4. That’s it. To see how to use it:
Get-help Set-LinuxVM -full |
Get-help Set-LinuxVM -full 5. Follow to instructions.
Share your comments if you see a bug or something..

Posted in Virtual Machine Manager, Windows Powershell | 4 Comments | 17,057 views | 08/03/2011 15:04
You can not monitor CSV Free Disk Space with PRTG by default. You should use custom scripts to do that. So I decided to write a Powershell script for that. But instead of using WMI in Powershell, using Powershell commands with Remote Powershell is a lot easier. Also this is an example for you about how to execute your own Powershell scripts on remote servers. Also this is a great example for Remote Powershell functionality if you are not familiar with it.
First of all, you need my PS1 script for monitoring:
1
2
3
4
5
6
7
8
9
10
11
12
13
14
15
16
17
18
19
20
21
22
23
24
25
26
27
28
29
30
31
32
33
34
35
36
37
38
39
40
41
42
43
44
45
46
47
48
49
50
51
52
53
54
55
56
57
58
59
60
61
62
63
64
65
66
| $HostIP = $args[0] # 192.168.2.1
$CSVName = $args[1] # Cluster Disk 1
Function Get-RemoteState
{
$RemoteState = (Get-PSSession -ComputerName $HostIP).State
}
Function Remove-RemoteState
{
Remove-PSSession * -EA SilentlyContinue
}
Function Get-PercentFree
{
Param ($Session, $CSVName)
Invoke-Command -Session $Session -ArgumentList $CSVName -ScriptBlock {
param($CSVName)
Import-Module FailoverClusters
$PercentFree = ((Get-ClusterSharedVolume -Name "$CSVName").SharedVolumeInfo | select -Expand Partition).PercentFree
$PercentFree
}
}
Function Get-FreeSpace
{
Param ($Session, $CSVName)
Invoke-Command -Session $Session -ArgumentList $CSVName -ScriptBlock {
param($CSVName)
Import-Module FailoverClusters
$FreeSpace = ((Get-ClusterSharedVolume -Name "$CSVName").SharedVolumeInfo | select -Expand Partition).FreeSpace
$FreeSpace
}
}
If ($RemoteState -eq "Opened")
{
$Session = Get-PSSession -ComputerName $HostIP
}
else
{
Remove-RemoteState
#$Code= Get-Content C:\prtgpass.txt
#$SecurePassword = Convertto-Securestring $Code
$SecurePassword = ConvertTo-SecureString "PASSWORD_HERE" -AsPlainText -Force
$Credentials = new-object -typename System.Management.Automation.PSCredential -argumentlist "DOMAIN\Administrator", $SecurePassword
$Session = New-PSSession -Computername $HostIP -Credential $Credentials
}
Get-RemoteState
$PercentFree = Get-PercentFree -Session $Session -CSVName $CSVName
$PercentFree = "$PercentFree"
$PercentFree = ($PercentFree.Split(".")[0])
$PercentFree = 100 - "$PercentFree"
if ($PercentFree -gt "90")
{
write-host $PercentFree,":Critical"
}
Else
{
write-host $PercentFree,":OK"
}
Exit-PSSession |
$HostIP = $args[0]     # 192.168.2.1
$CSVName = $args[1]    # Cluster Disk 1

Function Get-RemoteState
{
$RemoteState = (Get-PSSession -ComputerName $HostIP).State
}

Function Remove-RemoteState
{
Remove-PSSession * -EA SilentlyContinue
}

Function Get-PercentFree
{
Param ($Session, $CSVName)

	Invoke-Command -Session $Session -ArgumentList $CSVName -ScriptBlock {
	param($CSVName)
	Import-Module FailoverClusters
	$PercentFree = ((Get-ClusterSharedVolume -Name "$CSVName").SharedVolumeInfo | select -Expand Partition).PercentFree
	$PercentFree
	}
}

Function Get-FreeSpace
{
Param ($Session, $CSVName)

	Invoke-Command -Session $Session -ArgumentList $CSVName -ScriptBlock {
	param($CSVName)
	Import-Module FailoverClusters
	$FreeSpace = ((Get-ClusterSharedVolume -Name "$CSVName").SharedVolumeInfo | select -Expand Partition).FreeSpace
	$FreeSpace
	}
}

If ($RemoteState -eq "Opened")
{
$Session = Get-PSSession -ComputerName $HostIP
}
else
{
Remove-RemoteState
#$Code= Get-Content C:\prtgpass.txt
#$SecurePassword = Convertto-Securestring $Code
$SecurePassword = ConvertTo-SecureString "PASSWORD_HERE" -AsPlainText -Force
$Credentials = new-object -typename System.Management.Automation.PSCredential -argumentlist "DOMAIN\Administrator", $SecurePassword
$Session = New-PSSession -Computername $HostIP -Credential $Credentials
}

Get-RemoteState
$PercentFree = Get-PercentFree -Session $Session -CSVName $CSVName
$PercentFree = "$PercentFree"
$PercentFree = ($PercentFree.Split(".")[0])
$PercentFree = 100 - "$PercentFree"

if ($PercentFree -gt "90")
{
write-host $PercentFree,":Critical"
}
Else
{
write-host $PercentFree,":OK"
}
Exit-PSSession Now save as this script as “CSV Free Disk Space.ps1” and copy it to the “C:\Program Files (x86)\PRTG Network Monitor\Custom Sensors\EXE” folder on the PRTG -Probe- server. Only one note, you should change Domain and Password info in the script. You should write your Administrator name as “CONTOSO\Administrator”. You should write your password as clean text but I’ll work about that to find a way to encrypt it. Just change “PASSWORD_HERE” line and “DOMAN\Administrator” line in the script.
Before adding sensor on to PRTG, you should configure Remote Powershell functionality on PRTG server and on one of the Hyper-V Cluster Host.
First, go to PRTG host and execute on Powershell:
1
2
3
4
| Set-ExecutionPolicy Unrestricted
Set-Item WSMan:\localhost\Client\TrustedHosts *
Restart-Service winrm
Enable-PSRemoting |
Set-ExecutionPolicy Unrestricted
Set-Item WSMan:\localhost\Client\TrustedHosts *
Restart-Service winrm
Enable-PSRemoting One important note. If you use Windows Server 2008 R2 or Windows x64 versions, you should execute commands on both x86 version of Powershell and x64 version of Powershell.
x86 path: C:\Windows\System32\WindowsPowerShell\v1.0\powershell.exe
x64 path: C:\Windows\SysWOW64\WindowsPowerShell\v1.0\powershell.exe
Also you may need to disable UAC to execute Remote Powershell commands!
Then go to Hyper-V Cluster Host and execute:
Now go to the PRTG and create a custom sensor for Hyper-V Cluster Host.
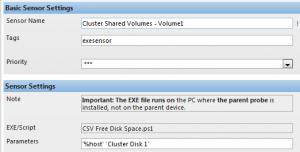
Only one important thing is “Parameters”. You should write exactly same things there:
If you have more than one CSV disk, just add them as a new sensor and parameters should be:
'%host' 'Cluster Disk 2'
'%host' 'Cluster Disk 3' |
'%host' 'Cluster Disk 2'
'%host' 'Cluster Disk 3' After a few minutes, PRTG will start showing Free Space information.

Actually I added “Used Space” to the PRTG. You can change it as “Free Space” if you want.
There are lines in the script:
1
2
3
| $PercentFree = "$PercentFree"
$PercentFree = ($PercentFree.Split(".")[0])
$PercentFree = 100 - "$PercentFree" |
$PercentFree = "$PercentFree"
$PercentFree = ($PercentFree.Split(".")[0])
$PercentFree = 100 - "$PercentFree" Just remove the last line like here:
1
2
| $PercentFree = "$PercentFree"
$PercentFree = ($PercentFree.Split(".")[0]) |
$PercentFree = "$PercentFree"
$PercentFree = ($PercentFree.Split(".")[0]) I hope this will help you to monitor your environment.

Posted in Exchange Server, Windows Powershell | No Comment | 4,586 views | 05/01/2011 16:29
Gerekli işletim sistemi bileşenlerini Powershell kullanarak kurabilirsiniz.
Öncelikle ServerManager modülünü import edin:
Import-Module ServerManager |
Import-Module ServerManager Şimdi gerekli bileşenleri yükleyebilirsiniz:
Add-WindowsFeature NET-Framework,RSAT-ADDS,Web-Server,Web-Basic-Auth,Web-Windows-Auth,Web-Metabase,Web-Net-Ext,Web-Lgcy-Mgmt-Console,WAS-Process-Model,RSAT-Web-Server,Web-ISAPI-Ext,Web-Digest-Auth,Web-Dyn-Compression,NET-HTTP-Activation,RPC-Over-HTTP-Proxy -Restart |
Add-WindowsFeature NET-Framework,RSAT-ADDS,Web-Server,Web-Basic-Auth,Web-Windows-Auth,Web-Metabase,Web-Net-Ext,Web-Lgcy-Mgmt-Console,WAS-Process-Model,RSAT-Web-Server,Web-ISAPI-Ext,Web-Digest-Auth,Web-Dyn-Compression,NET-HTTP-Activation,RPC-Over-HTTP-Proxy -Restart Bu bileşenler sadece CAS rolü için geçerlidir.

Posted in Exchange Server, Windows Powershell | No Comment | 4,057 views | 05/01/2011 16:20
Gerekli işletim sistemi bileşenlerini Powershell kullanarak kurabilirsiniz.
Öncelikle ServerManager modülünü import edin:
Import-Module ServerManager |
Import-Module ServerManager Şimdi gerekli bileşenleri yükleyebilirsiniz:
Add-WindowsFeature NET-Framework,RSAT-ADDS,Web-Server,Web-Basic-Auth,Web-Windows-Auth,Web-Metabase,Web-Net-Ext,Web-Lgcy-Mgmt-Console,WAS-Process-Model,RSAT-Web-Server -Restart |
Add-WindowsFeature NET-Framework,RSAT-ADDS,Web-Server,Web-Basic-Auth,Web-Windows-Auth,Web-Metabase,Web-Net-Ext,Web-Lgcy-Mgmt-Console,WAS-Process-Model,RSAT-Web-Server -Restart Bu bileşenler sadece Hub Transport rolü için geçerlidir.
|


