Posted in Virtual Machine Manager, Windows Powershell | 4 Comments | 11,001 views | 14/11/2011 11:18
You may get this error when you try to refresh virtual machine.
Error (12711)
VMM cannot complete the WMI operation on server node01.yusufozturk.info because of error: [MSCluster_Resource.Name=”69598e3a-3567-4b40-b7d9-dd08ed1169df”] The cluster resource could not be found.
(The cluster resource could not be found (0x138F))
Recommended Action
Resolve the issue and then try the operation again. You should refresh cluster configuration to fix this issue. Go to one of the Cluster nodes.
Execute the commands on Powershell:
1
2
| Import-Module FailoverClusters
Get-ClusterResource -c CLUSTERNAME | where {$_.resourcetype.name -eq 'virtual machine configuration'} | Update-ClusterVirtualMachineConfiguration |
Import-Module FailoverClusters
Get-ClusterResource -c CLUSTERNAME | where {$_.resourcetype.name -eq 'virtual machine configuration'} | Update-ClusterVirtualMachineConfiguration After that, you can refresh Cluster and VM from SCVMM console. That should fix the issue.

Posted in Windows Powershell | 2 Comments | 5,402 views | 31/07/2011 23:17
Merhaba,
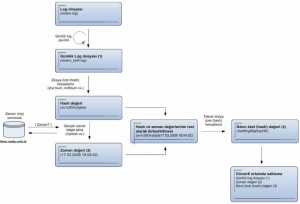
Bildiğiniz gibi 5651 gereği web, ftp ve mail loglarını şartnameye uygun olarak imzalamalı ve bu imzalı logları 6 ay boyunca saklamalısınız. Şartnamede logların nasıl imzalanacağıyla ilgili söyle bir şematik anlatım var.

Yukardaki anlatımda da görebileceğiniz gibi aslında 3 farklı dosya saklamamız gerekiyor. Bunlar:
1. Log dosyası
2. Zaman damgası
3. Log hash’i ile zaman damgasının birleşik hash’i
Aşağıdaki Powershell scripti ile bu şartnameye uygun olarak hashleme yapabilirsiniz. Zaman sunucusu olarak script’te de tubitak kullanılmıştır.
1
2
3
4
5
6
7
8
9
10
11
12
13
14
15
16
17
18
19
20
21
22
23
24
25
26
27
28
29
30
31
32
33
34
35
36
37
38
39
40
41
42
43
44
45
46
47
48
49
50
51
52
53
54
55
56
| $Path = "D:\FTP\MailServerLogs"
$TargetFolder = Get-ChildItem "$Path" -Recurse
$CryptoServiceProvider = [System.Security.Cryptography.MD5CryptoServiceProvider];
$HashAlgorithm = New-Object $CryptoServiceProvider
foreach ($File in $TargetFolder)
{
$FileName = $File.Name
$FilePath = $File.DirectoryName
$SigName = $FileName + ".sign"
$SigPath = $FilePath + "\" + $SigName
$DateName = $FileName + ".date"
$DatePath = $FilePath + "\" + $DateName
if ((Test-Path $DatePath) -eq "True")
{
Write-Host "Date file is already exist."
}
else
{
$DateString = Get-Date -uformat "%d.%m.%Y"
$TimeString = (w32tm /stripchart /computer:time.ume.tubitak.gov.tr /samples:1)[-1].split("")[0]
$DateString = $DateString + " " + $TimeString
$DateFile = New-Item -Path "$FilePath" -Name $DateName -type "file" -value $DateString
}
if ((Test-Path $SigPath) -eq "True")
{
Write-Host "Hashtag is already exist."
}
else
{
$Fc = Get-Content $FilePath\$FileName
if ($Fc.Count -gt 0)
{
$Encoding = New-Object System.Text.ASCIIEncoding
$Bytes = $Encoding.GetBytes($Fc)
$HashByteArray = $HashAlgorithm.ComputeHash($Bytes)
$Hashstring = ""
foreach ($Byte in $HashByteArray) {$Hashstring += $Byte.tostring("x2")}
$SigFile = New-Item -Path "$FilePath" -Name $SigName -type "file" -value $Hashstring
Start-Sleep -m 500
}
}
$HashTag = Get-Content $FilePath\$SigName
$HashTag = $HashTag + $DateString
Remove-Item -Path $FilePath\$SigName
$Encoding = New-Object System.Text.ASCIIEncoding
$Bytes = $Encoding.GetBytes($HashTag)
$HashByteArray = $HashAlgorithm.ComputeHash($Bytes)
$Hashstring = ""
foreach ($Byte in $HashByteArray) {$Hashstring += $Byte.tostring("x2")}
$SigFile = New-Item -Path "$FilePath" -Name $SigName -type "file" -value $Hashstring
Write-Host "$FileName is signed!"
} |
$Path = "D:\FTP\MailServerLogs"
$TargetFolder = Get-ChildItem "$Path" -Recurse
$CryptoServiceProvider = [System.Security.Cryptography.MD5CryptoServiceProvider];
$HashAlgorithm = New-Object $CryptoServiceProvider
foreach ($File in $TargetFolder)
{
    $FileName = $File.Name
    $FilePath = $File.DirectoryName
    $SigName = $FileName + ".sign"
    $SigPath = $FilePath + "\" + $SigName
	$DateName = $FileName + ".date"
	$DatePath = $FilePath + "\" + $DateName

	if ((Test-Path $DatePath) -eq "True")
    {
        Write-Host "Date file is already exist."
    }
    else
	{
		$DateString = Get-Date -uformat "%d.%m.%Y"
		$TimeString = (w32tm /stripchart /computer:time.ume.tubitak.gov.tr /samples:1)[-1].split("")[0]
		$DateString = $DateString + " " + $TimeString
		$DateFile = New-Item -Path "$FilePath" -Name $DateName -type "file" -value $DateString
	}

	if ((Test-Path $SigPath) -eq "True")
    {
        Write-Host "Hashtag is already exist."
    }
    else
    {
        $Fc = Get-Content $FilePath\$FileName
        if ($Fc.Count -gt 0)
        {
            $Encoding = New-Object System.Text.ASCIIEncoding
            $Bytes = $Encoding.GetBytes($Fc)
            $HashByteArray = $HashAlgorithm.ComputeHash($Bytes)
            $Hashstring = ""
            foreach ($Byte in $HashByteArray) {$Hashstring += $Byte.tostring("x2")}
            $SigFile = New-Item -Path "$FilePath" -Name $SigName -type "file" -value $Hashstring
            Start-Sleep -m 500
        }
    }

	$HashTag = Get-Content $FilePath\$SigName
	$HashTag = $HashTag + $DateString
	Remove-Item -Path $FilePath\$SigName
	$Encoding = New-Object System.Text.ASCIIEncoding
    $Bytes = $Encoding.GetBytes($HashTag)
    $HashByteArray = $HashAlgorithm.ComputeHash($Bytes)
    $Hashstring = ""
    foreach ($Byte in $HashByteArray) {$Hashstring += $Byte.tostring("x2")}
    $SigFile = New-Item -Path "$FilePath" -Name $SigName -type "file" -value $Hashstring

	Write-Host "$FileName is signed!"
} Script’in path’ini değiştirmeniz ve bir cronjob olarak tanımlamanız yeterli olacaktır.

Posted in Linux Server, Virtual Machine Manager, Windows Powershell | No Comment | 3,866 views | 27/07/2011 13:59
Yeni Hyper-V Linux Integration Service v3.1 ile birlikte gelen KVP Exchange desteği sayesinde bir çok bilgiyi çekebilmeniz mümkün. Öncelikle yapmanız gereken Get-HyperVKVP dosyasını indirmek ve bir Hyper-V sunucusunun üzerine kurmak olacaktır.
Download:
Scripti Hyper-V sunucusu üzerinde aşağıdaki gibi çalıştırabilirsiniz.
.\Get-HyperVKVP.ps1 VMName |
.\Get-HyperVKVP.ps1 VMName Hyper-V üzerindeki CentOS 6 için örnek bir script çıktısı:
PS C:\> .\Get-HyperVKVP.ps1 Centos6
FullyQualifiedDomainName: centos6.yusufozturk.info
IntegrationServicesVersion: 3.1
NetworkAddressIPv4: 192.168.2.2
NetworkAddressIPv6: fe80::215:5dff
OSBuildNumber: 2.6.32-71.el6.x86_64
OSName: CentOS Linux release 6.0 (Final)
OSVersion: 2.6.32-71.el6.x86_64
ProcessorArchitecture: x86_64 Get-HyperVKVP.ps1 dosyasının kaynak kodu:
1
2
3
4
5
6
7
8
9
10
11
12
13
14
15
16
17
| $vm = $args[0]
filter Import-CimXml
{
$CimXml = [Xml]$_
$CimObj = New-Object -TypeName System.Object
foreach ($CimProperty in $CimXml.SelectNodes("/INSTANCE/PROPERTY"))
{
if ($CimProperty.Name -eq "Name" -or $CimProperty.Name -eq "Data")
{
$CimObj | Add-Member -MemberType NoteProperty -Name $CimProperty.NAME -Value $CimProperty.VALUE
}
}
$CimObj
}
$VmObj = Get-WmiObject -Namespace root\virtualization -Query "Select * From Msvm_ComputerSystem Where ElementName='$vm'"
$KvpObj = Get-WmiObject -Namespace root\virtualization -Query "Associators of {$VmObj} Where AssocClass=Msvm_SystemDevice ResultClass=Msvm_KvpExchangeComponent"
$KvpObj.GuestIntrinsicExchangeItems | Import-CimXml |
$vm = $args[0]
filter Import-CimXml
{
    $CimXml = [Xml]$_
    $CimObj = New-Object -TypeName System.Object
    foreach ($CimProperty in $CimXml.SelectNodes("/INSTANCE/PROPERTY"))
    {
		if ($CimProperty.Name -eq "Name" -or $CimProperty.Name -eq "Data")
		{
			$CimObj | Add-Member -MemberType NoteProperty -Name $CimProperty.NAME -Value $CimProperty.VALUE
		}
    }
    $CimObj
}
$VmObj = Get-WmiObject -Namespace root\virtualization -Query "Select * From Msvm_ComputerSystem Where ElementName='$vm'"
$KvpObj = Get-WmiObject -Namespace root\virtualization -Query "Associators of {$VmObj} Where AssocClass=Msvm_SystemDevice ResultClass=Msvm_KvpExchangeComponent"
$KvpObj.GuestIntrinsicExchangeItems | Import-CimXml Bilgileri WMI üzerinden çektiği için bu scripti SCVMM üzerinde kullanamazsınız.
Fakat SCVMM üzerinden Hyper-V’ye bir WMI bağlantısı açarak bu işlemi yapmanız da mümkün tabiki.

Posted in Exchange Server, Windows Powershell | No Comment | 8,214 views | 26/07/2011 23:14
If you have an MTA, you have to configure Send-Connector to use that MTA as a smarthost. If that MTA is yours, then you can set relay on that server for your Exchange servers. But what about 3rd party MTA providers like DynDNS? They give you username/password for Basic Authentication and you can’t send email without that credentials. So we also need to set Basic Authentication on Send-Connector but how? Because Hosted Exchange 2010 SP1 has no GUI and Powershell requires System.Management.Automation.PSCredential to accept your credentials. I’ll show you how to solve this.
1
2
3
| $SecurePassword = ConvertTo-SecureString "PASSWORD_HERE" -AsPlainText -Force
$Credentials = new-object -typename System.Management.Automation.PSCredential -argumentlist "USERNAME_HERE", $SecurePassword
Get-SendConnector "SEND_CONNECTOR_HERE" | Set-SendConnector -DNSRoutingEnabled $false -SmartHosts 'SMARTHOST_HERE' -SmartHostAuthMechanism 'BasicAuth' -UseExternalDNSServersEnabled $false -AuthenticationCredential $Credentials |
$SecurePassword = ConvertTo-SecureString "PASSWORD_HERE" -AsPlainText -Force
$Credentials = new-object -typename System.Management.Automation.PSCredential -argumentlist "USERNAME_HERE", $SecurePassword
Get-SendConnector "SEND_CONNECTOR_HERE" | Set-SendConnector -DNSRoutingEnabled $false -SmartHosts 'SMARTHOST_HERE' -SmartHostAuthMechanism 'BasicAuth' -UseExternalDNSServersEnabled $false -AuthenticationCredential $Credentials For example you have an MTA service from DynDNS and your information:
Host: smtp.dyndns.org
Username: yusufozturk
Password: password
Default Send Connector: Internet Connector
So you should use this script for that informations:
1
2
3
| $SecurePassword = ConvertTo-SecureString "password" -AsPlainText -Force
$Credentials = new-object -typename System.Management.Automation.PSCredential -argumentlist "yusufozturk", $SecurePassword
Get-SendConnector "Internet Connector" | Set-SendConnector -DNSRoutingEnabled $false -SmartHosts 'smtp.dyndns.org' -SmartHostAuthMechanism 'BasicAuth' -UseExternalDNSServersEnabled $false -AuthenticationCredential $Credentials |
$SecurePassword = ConvertTo-SecureString "password" -AsPlainText -Force
$Credentials = new-object -typename System.Management.Automation.PSCredential -argumentlist "yusufozturk", $SecurePassword
Get-SendConnector "Internet Connector" | Set-SendConnector -DNSRoutingEnabled $false -SmartHosts 'smtp.dyndns.org' -SmartHostAuthMechanism 'BasicAuth' -UseExternalDNSServersEnabled $false -AuthenticationCredential $Credentials After this changes, you will be able to use your MTA.

Posted in Windows Powershell, Windows Server | No Comment | 3,903 views | 20/07/2011 12:44
Öncelikle Windows Advanced Firewall üzerinden kurallarınızın bir yedeğini almayı unutmayın.
Bu basit scripti, bir müşterimin isteğinden sonra Windows firewall kurallarını değiştirebilmek için yazdım.
Description’a göre arama yaparak, Remote Address bölümüne tanımlamak istediğiniz IP adresini ekliyor.
1
2
3
4
5
6
7
| $Rules=New-object -comObject HNetCfg.FwPolicy2
$Rules=$Rules.Rules | where {$_.Description -like "Inbound *" }
Foreach ($Rule in $Rules)
{
$Rule.RemoteAddresses = "10.10.10.1-10.10.10.50"
Write-Host "Kural değişti."
} |
$Rules=New-object -comObject HNetCfg.FwPolicy2
$Rules=$Rules.Rules | where {$_.Description -like "Inbound *" }
Foreach ($Rule in $Rules)
{
        $Rule.RemoteAddresses = "10.10.10.1-10.10.10.50"
        Write-Host "Kural değişti."
} Eğer yukarıda girdiğiniz firewall kuralını sonradan değiştirmek istiyorsanız, aşağıdakini kullanabilirsiniz.
1
2
3
4
5
6
7
8
9
10
11
12
13
14
| $Rules=New-object -comObject HNetCfg.FwPolicy2
$Rules=$Rules.Rules | where {$_.Description -like "Inbound *" }
Foreach ($Rule in $Rules)
{
if ($Rule.RemoteAddresses -like "*10.10.10.1*")
{
$Rule.RemoteAddresses = "10.10.10.1-10.10.10.50,172.16.254.0/24"
Write-Host "Kural değişti."
}
else
{
Write-Host "Kural değişmedi çünkü vermiş olduğunuz IP adresi ile eşleşmedi."
}
} |
$Rules=New-object -comObject HNetCfg.FwPolicy2
$Rules=$Rules.Rules | where {$_.Description -like "Inbound *" }
Foreach ($Rule in $Rules)
{
	if ($Rule.RemoteAddresses -like "*10.10.10.1*")
	{
		$Rule.RemoteAddresses = "10.10.10.1-10.10.10.50,172.16.254.0/24"
		Write-Host "Kural değişti."
	}
	else
	{
		Write-Host "Kural değişmedi çünkü vermiş olduğunuz IP adresi ile eşleşmedi."
	}
} Arama için çok sayıda bileşen kullanabilirsiniz. Ben sadece basitce mantığını göstermeye çalıştım.

Posted in Exchange Server, Windows Powershell | No Comment | 40,172 views | 30/06/2011 23:58
You can get DAG configuration with this script.
1
2
3
4
5
6
7
8
9
10
11
12
13
14
15
16
17
18
19
20
21
22
23
24
25
26
27
28
29
30
31
32
33
34
35
36
37
| $DAGMemberServersArray = New-Object System.Collections.ArrayList
If ($Selected.Count -eq "0")
{
Write-Host "You didn't choose any DAG configuration."
Write-Host " "
Write-Host " "
Read-Host "Press enter to go back"
}
else
{
foreach ($DAGConfMember in $Selected)
{
$DAGInfo = (Get-DatabaseAvailabilityGroup $DAGConfMember)
$DAGName = $DAGInfo.Name
$DAGWitnessServer = $DAGInfo.WitnessServer.fqdn
$DAGWitnessDirectory = $DAGInfo.WitnessDirectory.PathName
$DAGIPAddress = $DAGInfo.DatabaseAvailabilityGroupIpv4Addresses
Write-Host "DAG Name: $DAGName" -ForegroundColor Green
Write-Host "DAG Witness Server: $DAGWitnessServer" -ForegroundColor Green
Write-Host "DAG Witness Directory: $DAGWitnessDirectory" -ForegroundColor Green
Write-Host "DAG IP: $DAGIpAddress" -ForegroundColor Green
$DAGMemberServers = (Get-DatabaseAvailabilityGroup $DAGConfMember).Servers
Foreach ($DAGMemberServer in $DAGMemberServers)
{
$DAGMemberServersArray.Add("$DAGMemberServer") | Out-Null
}
Write-Host "Server Members: $DAGMemberServersArray" -ForegroundColor Green
Write-Host " "
Write-Host " "
$DAGMemberServersArray.Clear();
}
Read-Host "Press enter to go back"
$Selected.Clear();
} |
$DAGMemberServersArray = New-Object System.Collections.ArrayList

If ($Selected.Count -eq "0")
{
	Write-Host "You didn't choose any DAG configuration."
	Write-Host " "
	Write-Host " "
	Read-Host "Press enter to go back"
}
else
{
	foreach ($DAGConfMember in $Selected)
	{
		$DAGInfo = (Get-DatabaseAvailabilityGroup $DAGConfMember)
		$DAGName = $DAGInfo.Name
		$DAGWitnessServer = $DAGInfo.WitnessServer.fqdn
		$DAGWitnessDirectory = $DAGInfo.WitnessDirectory.PathName
		$DAGIPAddress = $DAGInfo.DatabaseAvailabilityGroupIpv4Addresses
		Write-Host "DAG Name: $DAGName" -ForegroundColor Green
		Write-Host "DAG Witness Server: $DAGWitnessServer" -ForegroundColor Green
		Write-Host "DAG Witness Directory: $DAGWitnessDirectory" -ForegroundColor Green
		Write-Host "DAG IP: $DAGIpAddress" -ForegroundColor Green
		$DAGMemberServers = (Get-DatabaseAvailabilityGroup $DAGConfMember).Servers
		Foreach ($DAGMemberServer in $DAGMemberServers)
		{
			$DAGMemberServersArray.Add("$DAGMemberServer") | Out-Null
		}
		Write-Host "Server Members: $DAGMemberServersArray" -ForegroundColor Green
		Write-Host " "
		Write-Host " "
		$DAGMemberServersArray.Clear();
	}

	Read-Host "Press enter to go back"

	$Selected.Clear();
} $Selected is an array of Mailbox Servers.

Posted in Exchange Server, Windows Powershell | No Comment | 4,763 views | 30/06/2011 23:54
This script checks all available hub transport servers for DAG membership.
1
2
3
4
5
6
7
8
9
10
11
12
13
14
15
16
17
18
19
20
21
22
23
24
25
26
27
28
29
30
31
32
33
34
| $AvailableHTServer = @(Get-ExchangeServer | where {$_.ServerRole -like "*HubTransport*" -and $_.ServerRole -notlike "*Mailbox*"})
$AvailableHTServerCount = $AvailableHTServer.Count
$DAGName = Read-Host "Enter a name for your DAG"
Write-Host " "
if ($AvailableHTServerCount -gt "0")
{
$AvailableHTServerName = $AvailableHTServer[0].Name
Write-Host "Would you like to use $AvailableHTServerName as a witness server?"
Write-Host "1) Yes"
Write-Host "2) No"
Write-Host " "
[int]$HTQuestion = Read-Host "Enter number to select an option"
Write-Host " "
if ($HTQuestion -eq "1")
{
$WitnessServer = $AvailableHTServerName
}
else
{
$WitnessServer = Read-Host "Enter witness server name (like $AvailableHTServerName)"
}
}
else
{
Write-Warning "There are no suitable Hub Transport servers as a witness server."
Write-Warning "You should enter a witness server which has no Mailbox role on it."
Write-Warning "Make sure that the group Exchange Trusted Subsystem is added to the local administrators of the server that will be the witness server."
Write-Host " "
$WitnessServer = Read-Host "Enter witness server name"
} |
$AvailableHTServer = @(Get-ExchangeServer | where {$_.ServerRole -like "*HubTransport*" -and $_.ServerRole -notlike "*Mailbox*"})
$AvailableHTServerCount = $AvailableHTServer.Count

$DAGName = Read-Host "Enter a name for your DAG"
Write-Host " "

if ($AvailableHTServerCount -gt "0")
{
	$AvailableHTServerName = $AvailableHTServer[0].Name

	Write-Host "Would you like to use $AvailableHTServerName as a witness server?"
	Write-Host "1) Yes"
	Write-Host "2) No"
	Write-Host " "
	[int]$HTQuestion = Read-Host "Enter number to select an option"
	Write-Host " "

	if ($HTQuestion -eq "1")
	{
		$WitnessServer = $AvailableHTServerName
	}
	else
	{
		$WitnessServer = Read-Host "Enter witness server name (like $AvailableHTServerName)"
	}
}
else
{
	Write-Warning "There are no suitable Hub Transport servers as a witness server."
	Write-Warning "You should enter a witness server which has no Mailbox role on it."
	Write-Warning "Make sure that the group Exchange Trusted Subsystem is added to the local administrators of the server that will be the witness server."
	Write-Host " "
	$WitnessServer = Read-Host "Enter witness server name"
} You can use $WitnessServer for provisioning.
|


