Posted in Virtual Machine Manager, Windows Powershell | No Comment | 6,556 views | 10/10/2012 14:25
Somehow, you have to migrate a new Hyper-V v3 VM back to Hyper-V v2 environment?
Then you may need to follow these steps.
Of course if you need to migrate a VM from Hyper-V v2 to Hyper-V v3, you can use this script for quick migration:
If you export a virtual machine from Hyper-V v3 and try to import Hyper-V v2, Hyper-V gives this error:
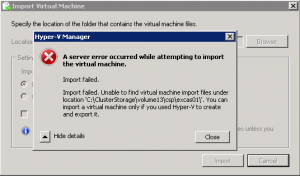
Because Hyper-V v3 export is not compatible with old version of Hyper-V.
Hyper-V v3 exports only XML config file, but Hyper-V v2 exports .exp file.
Achieve this problem, you need to use this Powershell export script on Hyper-V v3.
Before exporting virtual machine, do following steps:
1. Remove your all disks file from virtual machines.
2. Change your virtual machine switch as “Not Connected”.
Thanks to Ben, this script exports VM config in Hyper-V v2 style.
Now download EXP template from here:
Open your exported .exp file and template.exp file in the zip file with a text editor.
You will see $Replace1, $Replace2, $Replace3 and $Replace4 in template.exp.
You should change them with your exported .exp file values.
Follow these steps for modification:
1. Replace this one with your virtual machine GUID: $Replace1
2. Replace this one with your virtual machine name: $Replace2
3. Replace this one with your virtual machine MAC address: $Replace3
4. Replace this one with your virtual machine ethernet port GUID: $Replace4
5. Finally, replace template.exp file name with your exported .exp file name.
Now you can import it to Hyper-V v2. After import, you can attach your virtual disks to VM again.
Finally change your virtual machine switch and VLAN configuration. Now you can start your VM.

Posted in Virtual Machine Manager, Windows Powershell, Windows Server | No Comment | 2,374 views | 29/09/2012 07:56
SetLinuxVM v5 is out! It’s the best Linux VM preparation solution for Hyper-V on the market. But what’s changed with SetLinuxVM v5 and how it’s become fastest solution on the market?
1. Executing scripts instead of sending codes
In previous versions of SetLinuxVM, the idea was sending commands to virtual machine via Wmi interface. It was a great idea and nicely worked for 4 great versions of SetLinuxVM. But it took more than 5 minutes for a full preparation and it was a long time. So I made scripts and executing script is just easy and error-free.
Lets see old style of wmi code:
$SendCommand = $VMConsole.TypeText('echo "iface $iface inet static" >>/etc/network/interfaces'); |
$SendCommand = $VMConsole.TypeText('echo "iface $iface inet static" >>/etc/network/interfaces'); Now I just use that way to execute scripts:
$SendCommand = $VMConsole.TypeText(". $ScriptPrefix-Unattended.sh"); |
$SendCommand = $VMConsole.TypeText(". $ScriptPrefix-Unattended.sh"); Also now it’s easier to change scripts as your way. Sample timezone configuration script:
1
2
3
4
5
6
7
8
9
10
11
12
13
14
| # Change Time Zone Configuration
If ($TimeZone)
{
$TimeZoneScript = "echo Setting Time Zone.." + "`n"
$TimeZoneScript += "ln -sf /usr/share/zoneinfo/$TimeZone /etc/localtime" + "`n"
$TimeZoneScript += "rm -f /etc/sysconfig/clock" + "`n"
$TimeZoneScript += "echo ZONE=`"$TimeZone`" >>/etc/sysconfig/clock" + "`n"
$TimeZoneScript += "echo 'UTC=true' >>/etc/sysconfig/clock" + "`n"
$TimeZoneScript += "echo 'ARC=false' >>/etc/sysconfig/clock" + "`n"
$TimeZoneScript += "echo End of Time Zone."
# Prepare Time Zone Script
Add-Content -Value $TimeZoneScript -Path "$UnattendedScriptPath\$ScriptPrefix-Unattended.sh"
} |
# Change Time Zone Configuration
If ($TimeZone)
{
	$TimeZoneScript = "echo Setting Time Zone.." + "`n"
	$TimeZoneScript += "ln -sf /usr/share/zoneinfo/$TimeZone /etc/localtime" + "`n"
	$TimeZoneScript += "rm -f /etc/sysconfig/clock" + "`n"
	$TimeZoneScript += "echo ZONE=`"$TimeZone`" >>/etc/sysconfig/clock" + "`n"
	$TimeZoneScript += "echo 'UTC=true' >>/etc/sysconfig/clock" + "`n"
	$TimeZoneScript += "echo 'ARC=false' >>/etc/sysconfig/clock" + "`n"
	$TimeZoneScript += "echo End of Time Zone."

	# Prepare Time Zone Script
	Add-Content -Value $TimeZoneScript -Path "$UnattendedScriptPath\$ScriptPrefix-Unattended.sh"
} If you are familiar with Linux Bash scripting, it is very easy to modify these codes for your requirements.
2. Linux Integration Components 3.4
With new Linux integration components, SetLinuxVM is now able to install LIC on CentOS/RHEL 5 and CentOS/RHEL 6.
So how do I know which distro are you using? It’s simple. I’m getting distro name with this command.
distro=$(cat /etc/issue | head -n 2 | tr -d "\n" | tr "[:upper:]" "[:lower:]") |
distro=$(cat /etc/issue | head -n 2 | tr -d "\n" | tr "[:upper:]" "[:lower:]") This gives the distro name. I use if/else statement to install it on your distro.
1
2
3
4
5
6
7
8
9
10
11
12
13
14
15
| $InstallLICScript += 'if [[ $distro == *6.0* ]] || [[ $distro == *6.1* ]] || [[ $distro == *6.2* ]]; then' + "`n"
$InstallLICScript += "cd RHEL6012" + "`n"
$InstallLICScript += "./install.sh" + "`n"
$InstallLICScript += 'elif [[ $distro == *6.3* ]]; then' + "`n"
$InstallLICScript += "cd RHEL63" + "`n"
$InstallLICScript += "./install.sh" + "`n"
$InstallLICScript += 'elif [[ $distro == *5.7* ]]; then' + "`n"
$InstallLICScript += "cd RHEL57" + "`n"
$InstallLICScript += "./install-rhel57.sh" + "`n"
$InstallLICScript += 'elif [[ $distro == *5.8* ]]; then' + "`n"
$InstallLICScript += "cd RHEL58" + "`n"
$InstallLICScript += "./install-rhel58.sh" + "`n"
$InstallLICScript += "else" + "`n"
$InstallLICScript += "echo Current distribution is not supported." + "`n"
$InstallLICScript += "fi" + "`n" |
$InstallLICScript += 'if [[ $distro == *6.0* ]] || [[ $distro == *6.1* ]] || [[ $distro == *6.2* ]]; then' + "`n"
$InstallLICScript += "cd RHEL6012" + "`n"
$InstallLICScript += "./install.sh" + "`n"
$InstallLICScript += 'elif [[ $distro == *6.3* ]]; then' + "`n"
$InstallLICScript += "cd RHEL63" + "`n"
$InstallLICScript += "./install.sh" + "`n"
$InstallLICScript += 'elif [[ $distro == *5.7* ]]; then' + "`n"
$InstallLICScript += "cd RHEL57" + "`n"
$InstallLICScript += "./install-rhel57.sh" + "`n"
$InstallLICScript += 'elif [[ $distro == *5.8* ]]; then' + "`n"
$InstallLICScript += "cd RHEL58" + "`n"
$InstallLICScript += "./install-rhel58.sh" + "`n"
$InstallLICScript += "else" + "`n"
$InstallLICScript += "echo Current distribution is not supported." + "`n"
$InstallLICScript += "fi" + "`n" I talked about technical details of SetLinuxVM v5. I hope you enjoyed it. Thanks for using SetLinuxVM!

Posted in Virtual Machine Manager, Windows Server | No Comment | 3,792 views | 15/09/2012 21:45
Hyper-V üzerinde çalışan Linux sanal makineler için olan Linux Integration Services’in 3.4 versiyonu yayınlandı. Yeni sürüm ile birlikte artık Linux sanal sunucularda 4 vCPU’dan fazla vCPU kullanabilmek mümkün hale geldi.
Artık Linux için bir limit bulunmuyor, sanal vCPU limitini artık Hyper-V limitleri belirliyor. Windows Server 2012 ve Hyper-V Server 2012 ile birlikte Linux sanal sunucularınıza 64 vCPU verebilirsiniz. Ayrıca bu sürüm ile birlikte mouse/fare kullanımına tam destek geliyor.
Linux Integration Services v3.4 ile desteklenen Linux dağıtımları:
- Red Hat Enterprise Linux 5.7, 5.8, 6.0-6.3 x86 ve x64
- CentOS 5.7, 5.8, 6.0-6.3 x86 ve x64
Ayrıca IC ile elde edebileceğiniz diğer önemli destekler:
- Hot Add Disk (SCSI Controller üzerinden)
- Time Sync – Saat eşitleme Sentetik Network Adaptörü
- Integrated Shutdown (Sunucu kapatma)
- VLAN tagging (Sentetik network adaptörü üzerinden)
- Live Migration desteği
- Jumbo Frames (1500 bytes üzeri artık kullanılabilir)
Bu sürüm ile hala gelmeyen özellikler:
- Integration services: Volume Snapshot Backup
- Networking: TCP Offload
Hyper-V Linux Integration Services v3.4’ü indirmek için bu linki kullanabilirsiniz.

Posted in Virtual Machine Manager, Windows Powershell, Windows Server | 1 Comment | 3,992 views | 25/08/2012 22:01
I’m re-coding PoSHStats for Cluster support. Currently it just supports standalone hosts, but i have to extend that support for cluster environments. So while i’m playing with Powershell, I want to add some of my codes.
Getting Hyper-V hostname:
$Hostname = gc env:computername |
$Hostname = gc env:computername Getting Cluster name of your Hyper-V host:
$ClusterName = (Get-Cluster | Get-ClusterNode | where Name -eq $Hostname).Cluster.Name |
$ClusterName = (Get-Cluster | Get-ClusterNode | where Name -eq $Hostname).Cluster.Name Even better one for Hyper-V specifically:
$ClusterName = (@(Get-Cluster | Get-ClusterNode | where Name -eq $Hostname | Get-ClusterGroup | where GroupType -eq "VirtualMachine") | Select-Object -First 1).Cluster.Name |
$ClusterName = (@(Get-Cluster | Get-ClusterNode | where Name -eq $Hostname | Get-ClusterGroup | where GroupType -eq "VirtualMachine") | Select-Object -First 1).Cluster.Name Also I see that this doesn’t work as expected on PowerShell v3, so don’t use something like this:
$ClusterName = @(Get-Cluster | Get-ClusterNode | where Name -eq $Hostname | Get-ClusterGroup | where GroupType -eq "VirtualMachine").Cluster.Name[0] |
$ClusterName = @(Get-Cluster | Get-ClusterNode | where Name -eq $Hostname | Get-ClusterGroup | where GroupType -eq "VirtualMachine").Cluster.Name[0] Getting all clustered virtual machines:
$VMs = Get-Cluster $ClusterName | Get-ClusterGroup | Where GroupType -eq "VirtualMachine" | Get-VM |
$VMs = Get-Cluster $ClusterName | Get-ClusterGroup | Where GroupType -eq "VirtualMachine" | Get-VM Also you can extend your query for resource monitoring:
$VMs = Get-Cluster -Name $ClusterName | Get-ClusterGroup | Where GroupType -eq "VirtualMachine" | Get-VM | where ResourceMeteringEnabled -eq $True | Measure-VM |
$VMs = Get-Cluster -Name $ClusterName | Get-ClusterGroup | Where GroupType -eq "VirtualMachine" | Get-VM | where ResourceMeteringEnabled -eq $True | Measure-VM Getting free space of Cluster Shared Volume:
1
2
3
| $CSVVolume = "Volume1"
$CSVDisk = Get-ClusterSharedVolume | Select -Expand SharedVolumeInfo | Where FriendlyVolumeName -match "$CSVVolume"
[int]$HostDiskDriveFreeSpace = ([math]::round((($CSVDisk | Select -Expand Partition).FreeSpace / 1GB), 0)) |
$CSVVolume = "Volume1"
$CSVDisk = Get-ClusterSharedVolume | Select -Expand SharedVolumeInfo | Where FriendlyVolumeName -match "$CSVVolume"
[int]$HostDiskDriveFreeSpace = ([math]::round((($CSVDisk | Select -Expand Partition).FreeSpace / 1GB), 0)) Getting total disk space of Cluster Shared Volume:
1
2
3
| $CSVVolume = "Volume1"
$CSVDisk = Get-ClusterSharedVolume | Select -Expand SharedVolumeInfo | Where FriendlyVolumeName -match "$CSVVolume"
[int]$HostDiskSpace = ([math]::round((($CSVDisk | Select -Expand Partition).Size / 1GB), 0)) |
$CSVVolume = "Volume1"
$CSVDisk = Get-ClusterSharedVolume | Select -Expand SharedVolumeInfo | Where FriendlyVolumeName -match "$CSVVolume"
[int]$HostDiskSpace = ([math]::round((($CSVDisk | Select -Expand Partition).Size / 1GB), 0)) I’ll share more next days, keep watching..

Posted in Virtual Machine Manager, Windows Powershell, Windows Server | No Comment | 4,983 views | 28/07/2012 16:17
Best Hyper-V Linux Preparation tool SetLinuxvM v4.4 is out!
Changes:
* Fixed “Cannot connect to SCVMM Server” bug of SCVMM 2012 SP1.
* Added native “virtualmachinemanager” cmdlets support for SCVMM 2012 SP1.
* Added Linux Integration Services v3.3 as a default integration service.
* Added console keyboard language support. English is still default language. (Feature request from Jernej Zorko, Thanks!)
* SetLinuxVM no longer resumes operations if root password is not correct. (Feature request from Anonymous, Thanks!)
* Added System Center Config Manager Package Definition File for unattended installations.
* Enhanced installation/uninstallation support with Advanced Installer (Thanks to Advanced Installer!)
Now SetLinuxVM is even more perfect! Please go to official website to download latest version.
Again, thanks for using SetLinuxVM!

Posted in Virtual Machine Manager, Windows Powershell | 7 Comments | 7,168 views | 04/05/2012 01:02
I’m very proud to announce you the new version of SetLinuxVM! Today, SetLinuxVM is 1 year old!
After number of bug fixes, improvements and new functionalities, Set-LinuxVM reached to version 4.0 stable.
Fixed bugs:
1) Hyper-V LIC iso unmount issue.
2) Getting network card information issue.
3) Installation logic
New functionalities:
1) RestAPI support!
2) SetLinux Web Access: Web application for provisioning.
3) Built-in powershell web server (PoSHServer)
4) OutXML switch for XML results
General functionalities:
1) Unattended IP, Hostname and DNS configuration for Linux VMs.
2) Automatic Linux integration components installation.
3) Multi Distro Support: Debian, Ubuntu, Centos, Fedora, Redhat, Suse and CloudLinux!
4) Automatic CPanel and Parallels Plesk installation.
5) Linux VM Template support
6) Hyper-V support! You don’t need SCVMM to use this script.
7) Multiple Hyper-V and SCVMM host support.
8) Automatic Emulated NIC to Synthetic NIC support.
9) No need to internet connection (SSH access etc.) or additional changes on VM.
10) Custom Answer File support! You can execute your own scripts.
11) Hyper-V v2 and Hyper-V v3 support (fully works on Windows Server 2012 Beta)
12) System Center VMM 2008 and System Center VMM 2012 support
Screenshots:
Copyright (C) 2012 Yusuf Ozturk
This program is free software; you can redistribute it and/or modify it under the terms of the GNU General Public License as published by the Free Software Foundation; either version 2 of the License, or (at your option) any later version.
This program is distributed in the hope that it will be useful, but WITHOUT ANY WARRANTY; without even the implied warranty of MERCHANTABILITY or FITNESS FOR A PARTICULAR PURPOSE. See the GNU General Public License for more details.
You should have received a copy of the GNU General Public License along with this program; if not, write to the Free Software Foundation, Inc., 59 Temple Place, Suite 330, Boston, MA 02111-1307 USA Download:
Donate: Thanks to support this open source project!
Usage:
1. First, you should allow signed Powershell scripts:
Set-ExecutionPolicy AllSigned |
Set-ExecutionPolicy AllSigned 2. Extract file and move “SetLinuxVM” directory under to “C:\Windows\System32\WindowsPowerShell\v1.0\Modules”.
3. Import as a module:
4. That’s it. To see how to use it:
Get-help Set-LinuxVM -full |
Get-help Set-LinuxVM -full 5. Follow to instructions.
How to start SetLinuxVM Web Access?
1. Just go to Powershell and type:
You can search in my blog for how to create Linux VM templates!

Posted in Virtual Machine Manager | 1 Comment | 7,307 views | 27/04/2012 11:46
You can enable read optimized cache on CSV disk on Hyper-V v3.
However there is no such option on GUI to enable CSV Cache, so you should go with Powershell.
I set 4 GB memory for CSV Cache allocation: (by default, it’s 512 mb)
(Get-Cluster).SharedVolumeBlockCacheSizeInMB=4096 |
(Get-Cluster).SharedVolumeBlockCacheSizeInMB=4096 Then I need to enable CSV cache on clustered disk:
Get-ClusterSharedVolume "Cluster Disk 1" | Set-ClusterParameter CsvEnableBlockCache 1 |
Get-ClusterSharedVolume "Cluster Disk 1" | Set-ClusterParameter CsvEnableBlockCache 1 I want to show you my test results with different cache sizes.

|


