
Posted in Hosting & IIS7 | No Comment | 2,974 views | 01/12/2015 10:44
Cronjob’a günlük olarak tanımlayıp, 1 hafta önceki log dosyalarının otomatik ziplenerek silinmesini sağlayabilirsiniz.
IIS’in PowerShell Management Yönetim aracına ihtiyaç duyar. Kurulu değil ise Roles’den ekleyebilirsiniz. Fakat default olarak genelde kurulu olur.
1
2
3
4
5
6
7
8
9
10
11
12
13
14
15
16
17
18
19
20
21
22
23
24
25
26
27
28
29
30
31
32
33
34
35
36
37
38
39
40
41
42
43
44
45
46
47
48
49
50
51
52
53
54
55
56
57
58
59
60
61
62
63
64
65
66
67
68
69
70
71
72
73
74
75
76
77
78
79
80
81
82
83
84
85
86
87
88
89
90
91
92
93
94
95
96
97
98
99
100
101
102
103
104
105
| Import-Module WebAdministration
function ConvertTo-CompressedFile
{
param([string]$ZipPath)
# Get Files
[string[]]$Files = $input.FullName;
if ($Files -ne $Null)
{
# Load the assembly
[System.Reflection.Assembly]::LoadWithPartialName("System.IO.Compression.FileSystem") | Out-Null
# Check Zip Extension
if ($ZipPath -notlike "*.zip")
{
Write-Output "Please check your zip file path."
break;
}
# Check Zip Path
if(-not (Test-Path($ZipPath)))
{
# Get Zip File Name
$ZipName = $ZipPath.Split("\")[-1]
if ($ZipPath -notlike "*\*")
{
# Get Current Location
$CurrentLocation = (Get-Location).Path
# Get Current Zip File Path
$CurrentZipPath = $CurrentLocation + "\" + $ZipName
# Update Zip Path
$ZipPath = $CurrentZipPath;
}
# Create Zip File
Set-Content $ZipPath ("PK" + [char]5 + [char]6 + ("$([char]0)" * 18))
# Set File Attributes
(Get-ChildItem $ZipPath).IsReadOnly = $false
}
# Get Zip File
$ZipFile = [System.IO.Compression.ZipFile]::Open($ZipPath,"Update")
foreach($File in $Files)
{
# Get File Name
$FileName = $File.Split("\")[-1]
# Compress File
[System.IO.Compression.ZipFileExtensions]::CreateEntryFromFile($ZipFile,$File,$FileName,"optimal") | Out-Null
# Buffer
Start-Sleep -milliseconds 5
}
# Close Zip File
$ZipFile.Dispose()
# Output Zip Path
$ZipPath
}
}
# Get Web Sites
$WebSites = Get-Website | Select Name, Id, LogFile
foreach ($WebSite in $WebSites)
{
# Clear Variables
$LogFiles = $Null;
$LogFilePath = $Null;
# Get Web Site Information
$SiteName = $WebSite.Name
$SiteID = $WebSite.Id
# Get Web Site Log Path
$LogDirectory = $WebSite.LogFile.Directory -Replace '%SystemDrive%', $env:SystemDrive
$LogPath = $LogDirectory + "\W3SVC" + $SiteID
$LogFiles = Get-ChildItem $LogPath -Filter *.log -EA SilentlyContinue | Where {$_.LastWriteTime -lt (Get-Date).AddDays(-7)}
foreach ($LogFile in $LogFiles)
{
# IO Optimizer
Start-Sleep 5
# Log File Name
$LogPath = $LogFile.FullName
# Zip Name
$ZipPath = $LogPath + ".zip"
# Compress
$LogFile | ConvertTo-CompressedFile $ZipPath
# Remove
$LogFile | Remove-Item -Force -Confirm:$false
}
} |
Import-Module WebAdministration

function ConvertTo-CompressedFile
{
	param([string]$ZipPath)

	# Get Files
	[string[]]$Files = $input.FullName;

	if ($Files -ne $Null)
	{
		# Load the assembly
		[System.Reflection.Assembly]::LoadWithPartialName("System.IO.Compression.FileSystem") | Out-Null

		# Check Zip Extension
		if ($ZipPath -notlike "*.zip")
		{
			Write-Output "Please check your zip file path."
			break;
		}

		# Check Zip Path
		if(-not (Test-Path($ZipPath)))
		{
			# Get Zip File Name
			$ZipName = $ZipPath.Split("\")[-1]

			if ($ZipPath -notlike "*\*")
			{
				# Get Current Location
				$CurrentLocation = (Get-Location).Path

				# Get Current Zip File Path
				$CurrentZipPath = $CurrentLocation + "\" + $ZipName

				# Update Zip Path
				$ZipPath = $CurrentZipPath;
			}

			# Create Zip File
			Set-Content $ZipPath ("PK" + [char]5 + [char]6 + ("$([char]0)" * 18))

			# Set File Attributes
			(Get-ChildItem $ZipPath).IsReadOnly = $false
		}

		# Get Zip File
		$ZipFile = [System.IO.Compression.ZipFile]::Open($ZipPath,"Update")

		foreach($File in $Files)
		{
			# Get File Name
			$FileName = $File.Split("\")[-1]

			# Compress File
			[System.IO.Compression.ZipFileExtensions]::CreateEntryFromFile($ZipFile,$File,$FileName,"optimal") | Out-Null

			# Buffer
			Start-Sleep -milliseconds 5
		}

		# Close Zip File
		$ZipFile.Dispose()

		# Output Zip Path
		$ZipPath
	}
}

# Get Web Sites
$WebSites = Get-Website | Select Name, Id, LogFile

foreach ($WebSite in $WebSites)
{
	# Clear Variables
	$LogFiles = $Null;
	$LogFilePath = $Null;

	# Get Web Site Information
	$SiteName = $WebSite.Name
	$SiteID = $WebSite.Id

	# Get Web Site Log Path
	$LogDirectory = $WebSite.LogFile.Directory -Replace '%SystemDrive%', $env:SystemDrive
	$LogPath = $LogDirectory + "\W3SVC" +  $SiteID
	$LogFiles = Get-ChildItem $LogPath -Filter *.log -EA SilentlyContinue | Where {$_.LastWriteTime -lt (Get-Date).AddDays(-7)}

	foreach ($LogFile in $LogFiles)
	{
		# IO Optimizer
		Start-Sleep 5

		# Log File Name
		$LogPath = $LogFile.FullName

		# Zip Name
		$ZipPath = $LogPath + ".zip"

		# Compress
		$LogFile | ConvertTo-CompressedFile $ZipPath

		# Remove
		$LogFile | Remove-Item -Force -Confirm:$false
	}
} Umarım faydası dokunur. Kolay gelsin.

Posted in Hosting & IIS7, Windows Powershell | 1 Comment | 4,992 views | 16/01/2015 14:01
You can get active IIS log file paths with following script.
1
2
3
4
5
6
7
8
9
10
11
12
13
14
15
16
17
18
19
| # Get Web Sites
$WebSites = Get-Website | Select Name, Id, LogFile
foreach ($WebSite in $WebSites)
{
# Clear Variables
$LogFiles = $Null;
$LogFilePath = $Null;
# Get Web Site Information
$SiteName = $WebSite.Name
$SiteID = $WebSite.Id
# Get Web Site Log Path
$LogDirectory = $WebSite.LogFile.Directory -Replace '%SystemDrive%', $env:SystemDrive
$LogPath = $LogDirectory + "\W3SVC" + $SiteID
$LogFiles = Get-ChildItem $LogPath -Filter *.log -EA SilentlyContinue | Sort-Object LastWriteTime -Descending
if ($LogFiles) { $LogFilePath = $LogFiles[0].FullName; $LogFilePath; }
} |
# Get Web Sites
$WebSites = Get-Website | Select Name, Id, LogFile

foreach ($WebSite in $WebSites)
{
	# Clear Variables
	$LogFiles = $Null;
	$LogFilePath = $Null;

	# Get Web Site Information
	$SiteName = $WebSite.Name
	$SiteID = $WebSite.Id

	# Get Web Site Log Path
	$LogDirectory = $WebSite.LogFile.Directory -Replace '%SystemDrive%', $env:SystemDrive
	$LogPath = $LogDirectory + "\W3SVC" +  $SiteID
	$LogFiles = Get-ChildItem $LogPath -Filter *.log -EA SilentlyContinue | Sort-Object LastWriteTime -Descending
	if ($LogFiles) { $LogFilePath = $LogFiles[0].FullName; $LogFilePath; }
} That will give you path as an output.

Posted in Hosting & IIS7 | No Comment | 2,623 views | 27/12/2011 09:43
If you need to move your MySQL database from one server to another, you can use the following codes.
Dump:
mysqldump -u root -pPASSWORD DatabaseName > dbbackup.sql |
mysqldump -u root -pPASSWORD DatabaseName > dbbackup.sql Import:
mysql -u root -pPASSWORD DatabaseName < dbbackup.sql |
mysql -u root -pPASSWORD DatabaseName < dbbackup.sql You can do this process live.

Posted in Hosting & IIS7 | No Comment | 10,662 views | 27/12/2011 09:15
There is no quick way to drop all tables of a MySQL database. You can just drop the database instead. But if you just want to drop all tables, you can use following codes.
mysql -u root -pPASSWORD DatabaseName -e "show tables" | grep -v Tables_in | grep -v "+" | \gawk '{print "drop table " $1 ";"}' | mysql -u root -pPASSWORD DatabaseName |
mysql -u root -pPASSWORD DatabaseName -e "show tables" | grep -v Tables_in | grep -v "+" | \gawk '{print "drop table " $1 ";"}' | mysql -u root -pPASSWORD DatabaseName I found the code from another website but it was for password-less MySQL servers. I added password authentication.
Posted in Hosting & IIS7 | 2 Comments | 59,997 views | 26/12/2011 15:59
If you want to see arp table of Fortigate,
1. Login to Fortigate via SSH.
2. Go into VDOM (if you have)
config VDOM
edit CustomerVDOM01 |
config VDOM
edit CustomerVDOM01 3. Use the following command to see arp table.
Have fun!

Posted in Hosting & IIS7, Windows Server | No Comment | 5,302 views | 25/10/2011 12:53
You may get this error when you try to access MySQL server on Windows.
Host ‘localhost’ is not allowed to connect to this MySQL server.
Host ‘127.0.0.1’ is not allowed to connect to this MySQL server.
Solution:
1. Stop MySQL service (from services.msc)
2. Create a text file in C:\ called “init.txt”. Paste the following code and save it.
GRANT ALL PRIVILEGES ON mysql.* TO root@localhost IDENTIFIED BY 'YourPassword!' WITH GRANT OPTION;
GRANT ALL PRIVILEGES ON mysql.* TO root@127.0.0.1 IDENTIFIED BY 'YourPassword!' WITH GRANT OPTION; |
GRANT ALL PRIVILEGES ON mysql.* TO root@localhost IDENTIFIED BY 'YourPassword!' WITH GRANT OPTION;
GRANT ALL PRIVILEGES ON mysql.* TO root@127.0.0.1 IDENTIFIED BY 'YourPassword!' WITH GRANT OPTION; 3. Open command prompt (cmd)
4. Go to MySQL bin directory on cmd.
Example: C:\Program Files\MySQL\MySQL Server 5.1\bin |
Example: C:\Program Files\MySQL\MySQL Server 5.1\bin


Posted in Hosting & IIS7 | 1 Comment | 5,470 views | 25/09/2011 19:13
You can use WebPI 3.0 for installing PHP 5.3 and MySQL on Windows Server 8.
1. You can choose PHP 5.3.8 and URL Rewrite from WebPI.
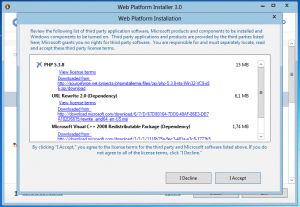
2. Installation completed without problem.
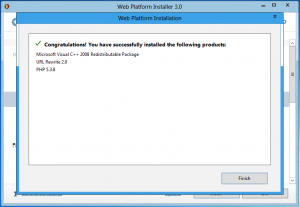
3. I also choose MySQL for database support.
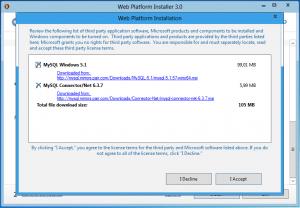
4. Installation completed without problem.
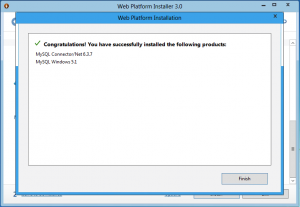
WebPI doesn’t work to install IIS on Windows 8 but you can still install PHP and MySQL component with it.

|


