Posted in Exchange Server | 6 Comments | 24,484 views | 31/08/2010 12:13
At Part 3, We configured OWA service and SSL certificate. This part, we will configure our 2 Hub Transport servers, EXGW01 and EXGW02. I’ll use Citrix Netscaler again to make a load balance between them.
Now on EXGW01, open Exchange Management Shell and execute;
New-ReceiveConnector -Name 'Inbound SMTP Array' -Usage 'Custom' -Bindings '94.101.92.2:25','94.101.92.2:587' -Fqdn 'mail.radore.com.tr' -RemoteIPRanges '0.0.0.0-255.255.255.255' -Server 'EXGW01' |
New-ReceiveConnector -Name 'Inbound SMTP Array' -Usage 'Custom' -Bindings '94.101.92.2:25','94.101.92.2:587' -Fqdn 'mail.radore.com.tr' -RemoteIPRanges '0.0.0.0-255.255.255.255' -Server 'EXGW01' Do same thing on EXGW02:
New-ReceiveConnector -Name 'Inbound SMTP Array' -Usage 'Custom' -Bindings '94.101.92.2:25','94.101.92.2:587' -Fqdn 'mail.radore.com.tr' -RemoteIPRanges '0.0.0.0-255.255.255.255' -Server 'EXGW02' |
New-ReceiveConnector -Name 'Inbound SMTP Array' -Usage 'Custom' -Bindings '94.101.92.2:25','94.101.92.2:587' -Fqdn 'mail.radore.com.tr' -RemoteIPRanges '0.0.0.0-255.255.255.255' -Server 'EXGW02' Use Get-ReceiveConnector to see recently added connectors:
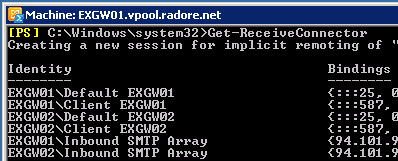
Enable receive connectors to get mail from external mail address:
Get-ReceiveConnector "Inbound *" | Set-ReceiveConnector -PermissionGroups:AnonymousUsers,ExchangeUsers,ExchangeServers |
Get-ReceiveConnector "Inbound *" | Set-ReceiveConnector -PermissionGroups:AnonymousUsers,ExchangeUsers,ExchangeServers Disable default receive connectors:
1
2
3
4
| 'EXGW01\Default *' | Set-ReceiveConnector -Enabled $false
'EXGW02\Default *' | Set-ReceiveConnector -Enabled $false
'EXGW01\Client *' | Set-ReceiveConnector -Enabled $false
'EXGW02\Client *' | Set-ReceiveConnector -Enabled $false |
'EXGW01\Default *' | Set-ReceiveConnector -Enabled $false
'EXGW02\Default *' | Set-ReceiveConnector -Enabled $false
'EXGW01\Client *' | Set-ReceiveConnector -Enabled $false
'EXGW02\Client *' | Set-ReceiveConnector -Enabled $false Now add new receive connectors for EXGW01 and EXGW02:
New-ReceiveConnector -Name 'EXGW01 SMTP' -Usage 'Custom' -Bindings '94.101.92.3:25','94101.92.3:587' -Fqdn 'mail.radore.com.tr' -RemoteIPRanges '0.0.0.0-255.255.255.255' -Server 'EXGW01' |
New-ReceiveConnector -Name 'EXGW01 SMTP' -Usage 'Custom' -Bindings '94.101.92.3:25','94101.92.3:587' -Fqdn 'mail.radore.com.tr' -RemoteIPRanges '0.0.0.0-255.255.255.255' -Server 'EXGW01' New-ReceiveConnector -Name 'EXGW02 SMTP' -Usage 'Custom' -Bindings '94.101.92.4:25','94101.92.4:587' -Fqdn 'mail.radore.com.tr' -RemoteIPRanges '0.0.0.0-255.255.255.255' -Server 'EXGW02' |
New-ReceiveConnector -Name 'EXGW02 SMTP' -Usage 'Custom' -Bindings '94.101.92.4:25','94101.92.4:587' -Fqdn 'mail.radore.com.tr' -RemoteIPRanges '0.0.0.0-255.255.255.255' -Server 'EXGW02' Configure load balancing on Citrix Netscaler. First add service definition as TCP – 25 for EXGW01.

Add same service definition for EXGW02 and Create a Virtual Server:

Choose Least Connection as LB Method:

Now telnet your NLB ip and you should see your FQDN:

Ok, now lets create a send connector to send mails to external address:
New-SendConnector -Name 'Exchange Gateway' -Usage 'Custom' -AddressSpaces 'SMTP:*;1' -DNSRoutingEnabled $true -UseExternalDNSServersEnabled $false -Fqdn 'mail.radore.com.tr' -SourceTransportServers 'EXGW01','EXGW02' |
New-SendConnector -Name 'Exchange Gateway' -Usage 'Custom' -AddressSpaces 'SMTP:*;1' -DNSRoutingEnabled $true -UseExternalDNSServersEnabled $false -Fqdn 'mail.radore.com.tr' -SourceTransportServers 'EXGW01','EXGW02' 
Create a SSL request for EXGW01:
New-ExchangeCertificate -FriendlyName 'mail.radore.com.tr' -GenerateRequest -PrivateKeyExportable $true -KeySize '2048' -SubjectName 'C=TR,S="Metrocity",L="Istanbul",O="Radore Hosting",OU="IT",CN=mail.radore.com.tr' -DomainName 'mail.radore.com.tr','autodiscover.radore.com.tr','EXCAS01','EXCAS02','EXGW01','EXGW02' -Server 'EXGW01' |
New-ExchangeCertificate -FriendlyName 'mail.radore.com.tr' -GenerateRequest -PrivateKeyExportable $true -KeySize '2048' -SubjectName 'C=TR,S="Metrocity",L="Istanbul",O="Radore Hosting",OU="IT",CN=mail.radore.com.tr' -DomainName 'mail.radore.com.tr','autodiscover.radore.com.tr','EXCAS01','EXCAS02','EXGW01','EXGW02' -Server 'EXGW01' Buy your commercial certificate and save certificate code to C:\cert.txt.
Import your certificate on EXGW01:
Import-ExchangeCertificate -FileData ([Byte[]]$(Get-Content -Path C:\Cert.txt -Encoding byte -ReadCount 0)) -Password:(Get-Credential).password |
Import-ExchangeCertificate -FileData ([Byte[]]$(Get-Content -Path C:\Cert.txt -Encoding byte -ReadCount 0)) -Password:(Get-Credential).password 
Assign SMTP services to certificate. Don’t forget to use your own Thumbprint.
Enable-ExchangeCertificate -Server 'EXGW01' -Services 'SMTP' -Thumbprint '5C9F5C946CAC544F054D24' |
Enable-ExchangeCertificate -Server 'EXGW01' -Services 'SMTP' -Thumbprint '5C9F5C946CAC544F054D24' 
We will export our certificate and import it to second Hub Transport server, EXGW02.
1
2
| $File = Export-ExchangeCertificate -Thumbprint '5C931E54FDA054D24' -BinaryEncoded:$true -Password (Get-Credential).password
Set-Content -Path "C:\htcert2.pfx" -Value $File.FileData -Encoding Byte |
$File = Export-ExchangeCertificate -Thumbprint '5C931E54FDA054D24' -BinaryEncoded:$true -Password (Get-Credential).password
Set-Content -Path "C:\htcert2.pfx" -Value $File.FileData -Encoding Byte 
Now, transfer your pfx file to EXGW02 and import it:
Import-ExchangeCertificate -FileData ([Byte[]]$(Get-Content -Path c:\htcert2.pfx -Encoding Byte -ReadCount 0)) -Password:(Get-Credential).password -PrivateKeyExportable $true |
Import-ExchangeCertificate -FileData ([Byte[]]$(Get-Content -Path c:\htcert2.pfx -Encoding Byte -ReadCount 0)) -Password:(Get-Credential).password -PrivateKeyExportable $true 
Enable SMTP service for EXGW02:
Enable-ExchangeCertificate -Server 'EXGW02' -Services 'SMTP' -Thumbprint '03BB616D714D03B9476' |
Enable-ExchangeCertificate -Server 'EXGW02' -Services 'SMTP' -Thumbprint '03BB616D714D03B9476' 
Go to Citrix Netscaler again and create a Virtual Server for SMTP.
Choose SSL as protocol and 443 as port number.

Configure LB method as Least Connection.
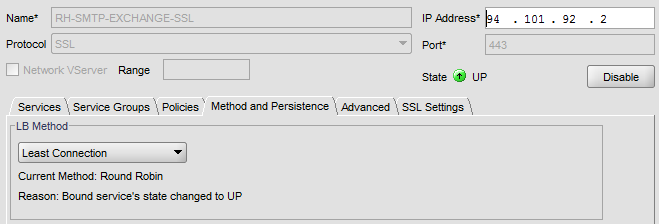
Check Hosted Exchange 2010 Setup Guide Part 3 for how to import SSL Certificate to Citrix:
Bind SSL certificate to virtual server.

Also you can add HTTP, 80 as another Virtual Server.
Please follow Hosted Exchange 2010 Part 3 for how to add HTTP 80 Virtual Server.
Go to EXGW01 and EXGW02, open IIS manager (inetmgr) and navigate to SSL Security for Default Web Site.
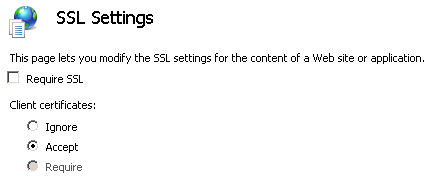
Clear “Require SSL” and click Accept from SSL settings.
Now test your Exchange Server 2010 SMTP address:
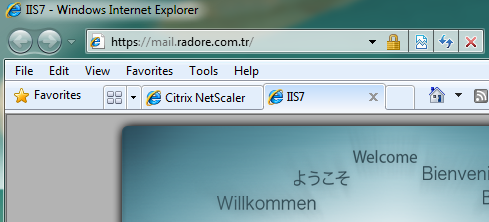
Wadaaaa again! We finished Citrix Netscaler Load Balancing for Hub Transport Servers.
Next Part, We will see how to configure Forefront Protection 2010 for Exchange Servers.
Thanks for reading.
Please continue with Part 5:
Hosted Exchange 2010 – Hosted Exchange 2010 Installation

Posted in Exchange Server | 6 Comments | 29,407 views | 30/08/2010 21:10
At the part 2, we configured mailbox databases. Also we made them high available with Exchange DAG.
Now at this part will see how to configure OWA load balancing and Certificate. I’ll use Citrix Netscaler for all load balancing requirements but you can use other hardware load balancing solutions like Brocade or software solutions. Idea is same for all nlb solutions :)
As the first part, I’ll load balance Exchange OWA.
Add your first CAS server as a service in Citrix.
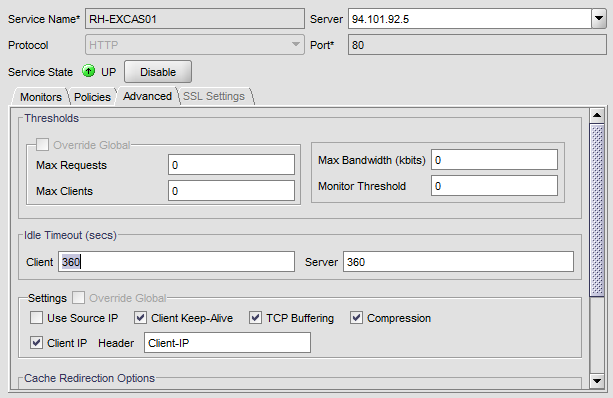
Do same thing for the second CAS Server.

Now, go to EXCAS01 and create certificate request for OWA.
Lets see default certificates:
Get-ExchangeCertificate -Server 'EXCAS01' |
Get-ExchangeCertificate -Server 'EXCAS01' 
So create your certificate request on EXCAS01:
New-ExchangeCertificate -FriendlyName 'exchange.radore.com.tr' -GenerateRequest -PrivateKeyExportable $true -KeySize '2048' -SubjectName 'C=TR,S="Metrocity",L="Istanbul",O="Radore Hosting",OU="IT",CN=exchange.radore.com.tr' -DomainName 'exchange.radore.com.tr','autodiscover.radore.com.tr','EXCAS01','EXCAS02','EXGW01','EXGW02' -Server 'EXCAS01' |
New-ExchangeCertificate -FriendlyName 'exchange.radore.com.tr' -GenerateRequest -PrivateKeyExportable $true -KeySize '2048' -SubjectName 'C=TR,S="Metrocity",L="Istanbul",O="Radore Hosting",OU="IT",CN=exchange.radore.com.tr' -DomainName 'exchange.radore.com.tr','autodiscover.radore.com.tr','EXCAS01','EXCAS02','EXGW01','EXGW02' -Server 'EXCAS01' Buy your commercial certificate and save certificate code to C:\cert.txt.
Import your certificate on EXCAS01:
Import-ExchangeCertificate -FileData ([Byte[]]$(Get-Content -Path C:\cert.txt -Encoding byte -ReadCount 0)) -Password:(Get-Credential).password |
Import-ExchangeCertificate -FileData ([Byte[]]$(Get-Content -Path C:\cert.txt -Encoding byte -ReadCount 0)) -Password:(Get-Credential).password 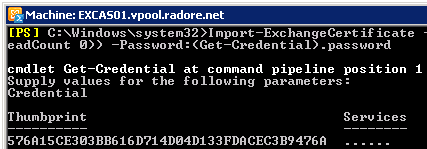
Assign IMAP, POP and IIS services to certificate. Don’t forget to use your own Thumbprint.
Enable-ExchangeCertificate -Server 'EXCAS01' -Services 'IMAP','POP','IIS' -Thumbprint '03BB616D714D04D133FDACEC3B9476' |
Enable-ExchangeCertificate -Server 'EXCAS01' -Services 'IMAP','POP','IIS' -Thumbprint '03BB616D714D04D133FDACEC3B9476' Lets check certificate status again:
Get-ExchangeCertificate -Server 'EXCAS01' |
Get-ExchangeCertificate -Server 'EXCAS01' 
As you see, services are assigned to new SSL certificate.
We will export our certificate and import it to second CAS server, EXCAS02.
1
2
| $File = Export-ExchangeCertificate -Thumbprint '03BB616D714D04D133FDACEC3B9476' -BinaryEncoded:$true -Password (Get-Credential).password
Set-Content -Path "C:\htcert.pfx" -Value $File.FileData -Encoding Byte |
$File = Export-ExchangeCertificate -Thumbprint '03BB616D714D04D133FDACEC3B9476' -BinaryEncoded:$true -Password (Get-Credential).password
Set-Content -Path "C:\htcert.pfx" -Value $File.FileData -Encoding Byte 
Now, transfer your pfx file to EXCAS02 and import it:
Import-ExchangeCertificate -FileData ([Byte[]]$(Get-Content -Path c:\htcert.pfx -Encoding Byte -ReadCount 0)) -Password:(Get-Credential).password -PrivateKeyExportable $true |
Import-ExchangeCertificate -FileData ([Byte[]]$(Get-Content -Path c:\htcert.pfx -Encoding Byte -ReadCount 0)) -Password:(Get-Credential).password -PrivateKeyExportable $true 
Lets check certificate status again:
Get-ExchangeCertificate -Server 'EXCAS02' |
Get-ExchangeCertificate -Server 'EXCAS02' 
Enable same services for EXCAS02:
Enable-ExchangeCertificate -Server 'EXCAS02' -Services 'IMAP','POP','IIS' -Thumbprint '03BB616D714D04D133FDACEC3B9476' |
Enable-ExchangeCertificate -Server 'EXCAS02' -Services 'IMAP','POP','IIS' -Thumbprint '03BB616D714D04D133FDACEC3B9476' Now import same certificate to Citrix Netscaler. Navigate to SSL and click import PKCS#12.
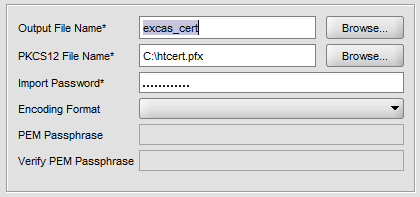
Choose your pfx file and give a name like excas_cert for local usage.
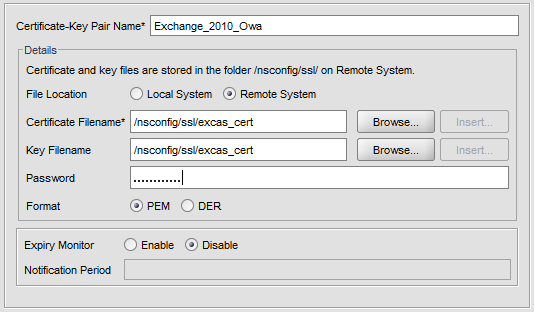
Then navigate to SSL -> Certificates and click Add.
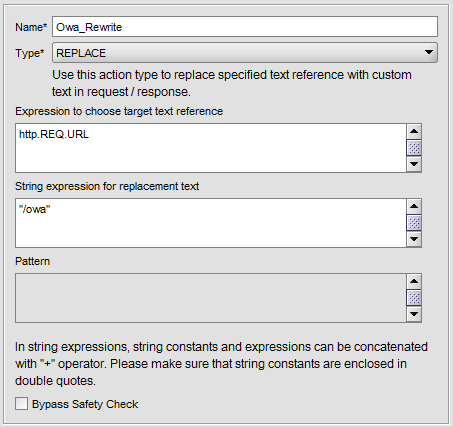
Now navigate to Rewrite -> Actions on Netscaler and click Add.
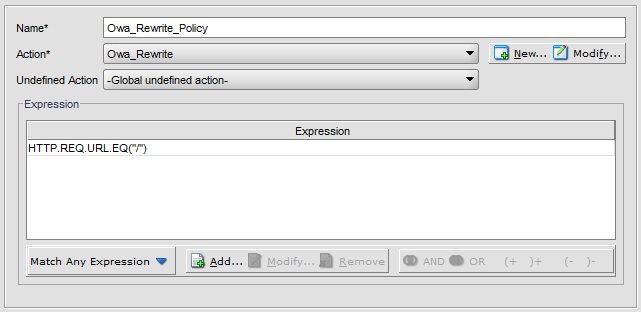
Navigate to Rewrite -> Policy and click Add.
We finished pre-required steps. Now navigate to Load Balancing -> Virtual Servers and click Add.
Give NLB IP Address. Choose SSL and port 443. Go to SSL and choose OWA certificate and click Add:
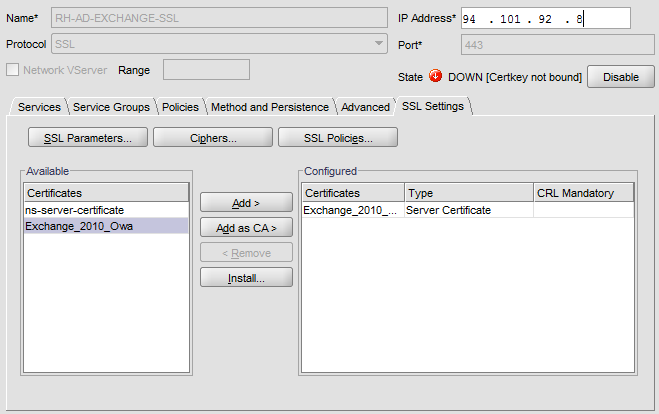
Add Owa services:

Configure Method and Persistence:
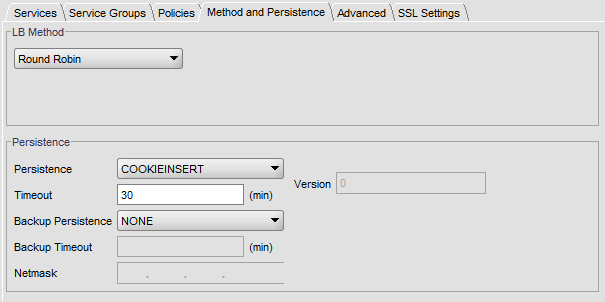
Configure OWA Redirection:

Click Create and finish SSL Virtual Server Load Balancing.
Now lets create another Virtual Server to redirect HTTP requests to HTTPS.
Navigate to Load Balancing -> Virtual Servers and click Add.
Give same NLB IP Address. Choose HTTP and port 80. Do NOT choose any service.
Go to Advanced Tab:

Also configure Method and Persistence:

Click Create and finish HTTP Virtual Server Load Balancing.
Because of you don’t select any service, Virtual Server should seen as Down.

Last step, go to IIS on EXCAS01 and EXCAS02. Configure SSL Security:
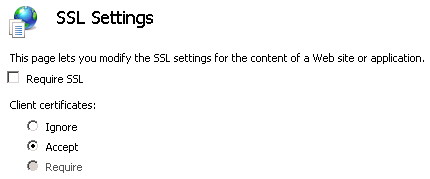
Clear “Require SSL” and click Accept from SSL settings. Do same things for: OWA, EWS, ECP..
All virtual directories should accept non HTTPS traffics.
Now test your Exchange Server 2010 OWA:
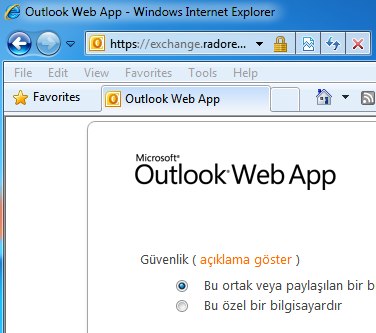
Wadaaaa! We finished Citrix Netscaler Load Balancing for OWA.
Next Part, We will see how to configure CAS arrays and Hub Transport server load balancing.
Thanks for reading.
Please continue with Part 4:
Hosted Exchange 2010 – Hosted Exchange 2010 Installation

Posted in Exchange Server | 2 Comments | 13,207 views | 30/08/2010 08:25
You may get this error when you try to open Exchange Server 2010 Management Console:
Connecting to remote server failed with the following error message: The connection to the specified remote host was refused. Verify that the WS-Management service is running on the remote host and configured to listen for requests on the correct port and HTTP URL. For more information, see the about_Remote_Troubleshooting Help topic
Resolution:
1) Check the applications pools. Start Exchange pool if it is stopped.
2) Ping server name. Be sure, ipv4 is used for communication.
3) Make sure C:\Windows\system32\iis_ssi.dll is exist.

Posted in Exchange Server | 5 Comments | 30,466 views | 29/08/2010 20:29
If you followed, at the Part 1, I installed two CAS + Mailbox Server and two Hub Transport Server. At the second part, I’ll configure Database Availability Groups between my two Mailbox servers.
First of all, you have to install Failover Cluster feature from Server Manager. After that I need to create Database Availability Group. I have to choose a Witness server. Witness server should be Hub Transport server in a recommended environment. So I choose it as my first Hub Transport Server called EXGW01.
New-DatabaseAvailabilityGroup -Name 'RadoreDAG' -WitnessServer 'EXGW01' -WitnessDirectory 'C:\RadoreDAG' |
New-DatabaseAvailabilityGroup -Name 'RadoreDAG' -WitnessServer 'EXGW01' -WitnessDirectory 'C:\RadoreDAG' You should execute this command on Exchange Management Shell. After the command, lets check our DAG.

As you see, I don’t have any member servers right now. I’ll join my Mailbox servers to DAG.
Add-DatabaseAvailabilityGroupServer -Identity 'RadoreDAG' -MailboxServer 'EXCAS01' |
Add-DatabaseAvailabilityGroupServer -Identity 'RadoreDAG' -MailboxServer 'EXCAS01' 
After adding first mailbox server, you can check your witness file directory. It should be created by Exchange DAG. Now let’s add second server to DAG. Also our cluster is created on Failover Cluster Manager.
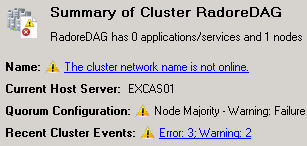
But as you see there is no network right now. So we should add them.
Let’s see ipv4 status.
Get-DatabaseAvailabilityGroup | FL Name,*IP* |
Get-DatabaseAvailabilityGroup | FL Name,*IP* Name : RadoreDAG
DatabaseAvailabilityGroupIpv4Addresses : {}
DatabaseAvailabilityGroupIpAddresses : {}

So we don’t have any network for DAG. Let’s create them now.
We should have 2 different networks. One is Public, other one is Replication network. On my environment, I use Replication network as a Backup Network. I’ll backup my Exchange servers with Microsoft System Center Data Protection Manager 2010 using replication network.
My Public Network: 94.101.92.0/24
My Replication Network: 192.168.0.0/16
Now, it’s time to create networks. For public network:
New-DatabaseAvailabilityGroupNetwork -DatabaseAvailabilityGroup RadoreDAG -Name Internet -Description "Internet Network" -Subnets 94.101.92.0/24 -ReplicationEnabled:$False |
New-DatabaseAvailabilityGroupNetwork -DatabaseAvailabilityGroup RadoreDAG -Name Internet -Description "Internet Network" -Subnets 94.101.92.0/24 -ReplicationEnabled:$False 
For replication network:
New-DatabaseAvailabilityGroupNetwork -DatabaseAvailabilityGroup RadoreDAG -Name Backup -Description "Backup Network" -Subnets 192.168.0.0/16 -ReplicationEnabled:$True |
New-DatabaseAvailabilityGroupNetwork -DatabaseAvailabilityGroup RadoreDAG -Name Backup -Description "Backup Network" -Subnets 192.168.0.0/16 -ReplicationEnabled:$True 
After configuration of networks, we should configure Group IP.
Set-DatabaseAvailabilityGroup -Identity RadoreDAG -DatabaseAvailabilityGroupIPAddresses 94.101.92.10 |
Set-DatabaseAvailabilityGroup -Identity RadoreDAG -DatabaseAvailabilityGroupIPAddresses 94.101.92.10 Ok, now check the Failover Cluster Manager:

As you see our DAG name is active. Also our networks are active.

So now we can add our second server to DAG.
Add-DatabaseAvailabilityGroupServer -Identity 'RadoreDAG' -MailboxServer 'EXCAS02' |
Add-DatabaseAvailabilityGroupServer -Identity 'RadoreDAG' -MailboxServer 'EXCAS02' 
Ok, our second server is active on DAG.

After second server, also our witness file share is active.
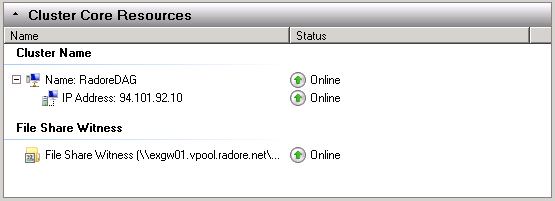
I configured the DAG and networks. Next, I’ll create 3 different databases for customers.
New-MailboxDatabase -Server 'EXCAS01' -Name 'Database01' -EdbFilePath 'C:\Program Files\Microsoft\Exchange Server\V14\Mailbox\Database01\Database01.edb' -LogFolderPath 'C:\Program Files\Microsoft\Exchange Server\V14\Mailbox\Database01' |
New-MailboxDatabase -Server 'EXCAS01' -Name 'Database01' -EdbFilePath 'C:\Program Files\Microsoft\Exchange Server\V14\Mailbox\Database01\Database01.edb' -LogFolderPath 'C:\Program Files\Microsoft\Exchange Server\V14\Mailbox\Database01' New-MailboxDatabase -Server 'EXCAS01' -Name 'Database02' -EdbFilePath 'C:\Program Files\Microsoft\Exchange Server\V14\Mailbox\Database02\Database02.edb' -LogFolderPath 'C:\Program Files\Microsoft\Exchange Server\V14\Mailbox\Database02' |
New-MailboxDatabase -Server 'EXCAS01' -Name 'Database02' -EdbFilePath 'C:\Program Files\Microsoft\Exchange Server\V14\Mailbox\Database02\Database02.edb' -LogFolderPath 'C:\Program Files\Microsoft\Exchange Server\V14\Mailbox\Database02' New-MailboxDatabase -Server 'EXCAS01' -Name 'Database03' -EdbFilePath 'C:\Program Files\Microsoft\Exchange Server\V14\Mailbox\Database03\Database03.edb' -LogFolderPath 'C:\Program Files\Microsoft\Exchange Server\V14\Mailbox\Database03' |
New-MailboxDatabase -Server 'EXCAS01' -Name 'Database03' -EdbFilePath 'C:\Program Files\Microsoft\Exchange Server\V14\Mailbox\Database03\Database03.edb' -LogFolderPath 'C:\Program Files\Microsoft\Exchange Server\V14\Mailbox\Database03' 
Let’s check our databases:

I created the databases. Now I should check databases status.
Get-MailboxDatabaseCopyStatus |
Get-MailboxDatabaseCopyStatus 
We have to mount them:
Mount-Database -Identity 'Database01' |
Mount-Database -Identity 'Database01' Mount-Database -Identity 'Database02' |
Mount-Database -Identity 'Database02' Mount-Database -Identity 'Database03' |
Mount-Database -Identity 'Database03' Lets check it again:

Now we can replicate them with other mailbox server:
Add-MailboxDatabaseCopy -Identity 'Database01' -MailboxServer 'EXCAS02' -ActivationPreference '2' |
Add-MailboxDatabaseCopy -Identity 'Database01' -MailboxServer 'EXCAS02' -ActivationPreference '2' Add-MailboxDatabaseCopy -Identity 'Database02' -MailboxServer 'EXCAS02' -ActivationPreference '2' |
Add-MailboxDatabaseCopy -Identity 'Database02' -MailboxServer 'EXCAS02' -ActivationPreference '2' Add-MailboxDatabaseCopy -Identity 'Database03' -MailboxServer 'EXCAS02' -ActivationPreference '2' |
Add-MailboxDatabaseCopy -Identity 'Database03' -MailboxServer 'EXCAS02' -ActivationPreference '2' You may get this error when you try operation:
A source-side operation failed. Error An error occurred while performing the seed operation. Error: An error occurred w
hile processing a request on server ‘EXCAS01’. Error: Database ‘bb1e972e-a343-4cfe-8544-39f18facd816’ was not active on
source server ‘EXCAS01’.. [Database: Database01, Server: EXCAS02.vpool.radore.net]
+ CategoryInfo : InvalidOperation: (:) [Add-MailboxDatabaseCopy], SeedInProgressException
+ FullyQualifiedErrorId : E25C52CD,Microsoft.Exchange.Management.SystemConfigurationTasks.AddMailboxDatabaseCopy
Thats a replication issue. Don’t worry about it. Let’s make them available.
First check their replicate status:
Get-MailboxDatabaseCopyStatus -Identity 'Database01' |
Get-MailboxDatabaseCopyStatus -Identity 'Database01' Get-MailboxDatabaseCopyStatus -Identity 'Database02' |
Get-MailboxDatabaseCopyStatus -Identity 'Database02' Get-MailboxDatabaseCopyStatus -Identity 'Database03' |
Get-MailboxDatabaseCopyStatus -Identity 'Database03' 
We have to start replication:
Resume-MailboxDatabaseCopy -Identity 'Database01\EXCAS02' |
Resume-MailboxDatabaseCopy -Identity 'Database01\EXCAS02' Resume-MailboxDatabaseCopy -Identity 'Database02\EXCAS02' |
Resume-MailboxDatabaseCopy -Identity 'Database02\EXCAS02' Resume-MailboxDatabaseCopy -Identity 'Database03\EXCAS02' |
Resume-MailboxDatabaseCopy -Identity 'Database03\EXCAS02' 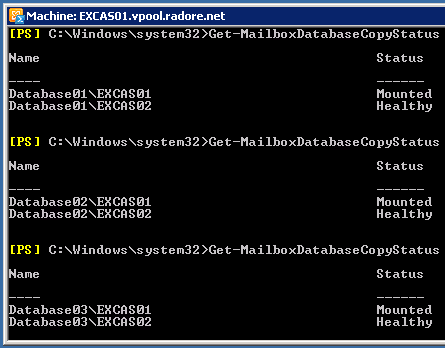
So let’s move default mailboxes to new DAG databases.
Get-Mailbox | New-MoveRequest -TargetDatabase "Database01" |
Get-Mailbox | New-MoveRequest -TargetDatabase "Database01" 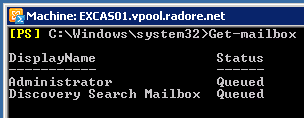
To check Move Request status:

So if you see that as “Completed” than you can remove requests:
Get-MoveRequest | Remove-MoveRequest |
Get-MoveRequest | Remove-MoveRequest 
Now it’s time to move hidden mailboxes. First see them:

Get-Mailbox -Arbitration | New-MoveRequest -TargetDatabase “Database01” |
Get-Mailbox -Arbitration | New-MoveRequest -TargetDatabase “Database01” 

Get-MoveRequest | Remove-MoveRequest |
Get-MoveRequest | Remove-MoveRequest 
So we moved all default mailboxes. Now we can delete default mailbox databases.

'Mailbox Database 0342336127 (YOUR UNIQUE ID) ' | Remove-MailboxDatabase |
'Mailbox Database 0342336127 (YOUR UNIQUE ID) ' | Remove-MailboxDatabase 
We completed our steps. As a final step, let’s check replication health status.
Test-ReplicationHealth 'EXCAS01' |
Test-ReplicationHealth 'EXCAS01' 
Test-ReplicationHealth 'EXCAS02' |
Test-ReplicationHealth 'EXCAS02' 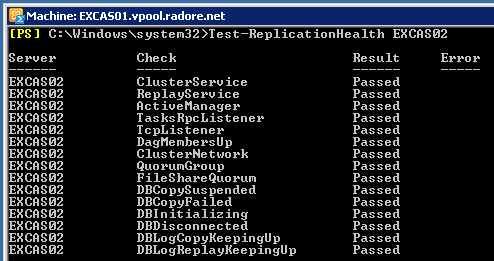
Now we have 3 databases and a fully working DAG environment. At the next part, I’ll show you how to create mailboxes for customers. Then we will see how to backup databases with Data Protection Manager 2010.
Please continue with Part 3:
Hosted Exchange 2010 – Hosted Exchange 2010 Installation

Posted in Exchange Server | 2 Comments | 24,377 views | 28/08/2010 16:46
When you try to uninstall Exchange Server 2010, you can get this error message:
The following error was generated when “$error.Clear(); uninstall-MsiPackage -PackagePath ($RoleInstallPath + “Mailbox\MSFTE.MSI”) -LogFile ($RoleSetupLoggingPath + “\InstallSearch.msilog”)” was run: “Couldn’t open package ‘C:\Program Files\Microsoft\Exchange Server\V14\Mailbox\MSFTE.MSI’. Another version of this product is already installed. Installation of this version cannot continue. To configure or remove the existing version of this product, use Add/Remove Programs on the Control Panel. Error code is 1638.
That’s because of Exchange Server Rollup 4 installation. Open Add Remove Programs and find Microsoft Full Text Indexing Engine for Exchange. Right-Click it and select to repair. After repair process, you should uninstall your Exchange Server roles.

Posted in Exchange Server | 13 Comments | 71,650 views | 28/08/2010 09:17
A few days ago, Exchange Server 2010 SP1 just released and it’s time to install a Hosted Exchange organization without HMC. Before SP1 installation, you should not install any Exchange Server on your current domain forest. If you have one, you should remove it or create a new forest for the Exchange Server 2010 SP1. What I will have in my environment:
* 2 x 1 Hub Transport Role
* 2 x 1 CAS + Mailbox Role
I don’t have enough resource to split CAS and Mailbox Role. If you don’t need a huge infrastructure, you can do same thing as me. Now I’m ready to install Exchange Server 2010 SP1.
Download Microsoft Exchange Server 2010 SP1 from here:
It’s an exe file. You should extract it first. For your information, for the Hosted Exchange infrastructure, you should install SP1 by command line. There is no option on GUI for Hosted Exchange.
I’m going to install one of my Hub Transport server called EXGW01. As the first step, install required features:
servermanagercmd /ip Exchange-All.xml |
servermanagercmd /ip Exchange-All.xml 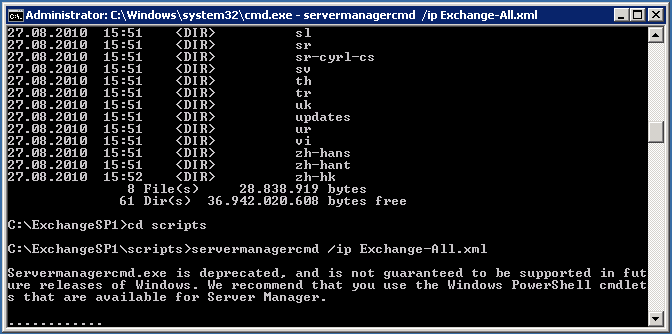
Set “NetTcpPortSharing” startup type as Automatic with Powershell:
Set-Service NetTcpPortSharing –startuptype Automatic |
Set-Service NetTcpPortSharing –startuptype Automatic Also Exchange setup has to extend active directory scheme so you need to install:
ServerManagerCmd -i RSAT-ADDS |
ServerManagerCmd -i RSAT-ADDS After required features installation, you should restart the server.
When restart is completed, install Office 2010 filter pack.
Now we are ready to go.
Open a command prompt windows (CMD) and type install command.
setup.com /mode:install /role:HT,MT /organizationName:HostedExchange /hosting |
setup.com /mode:install /role:HT,MT /organizationName:HostedExchange /hosting Full list of Role codes:
HubTransport: HT
ClientAccess: CA
Mailbox: MB
EdgeTransport: ET
ManagementTools: MT
So Step 1 is below:

At the same time lets check schema status:
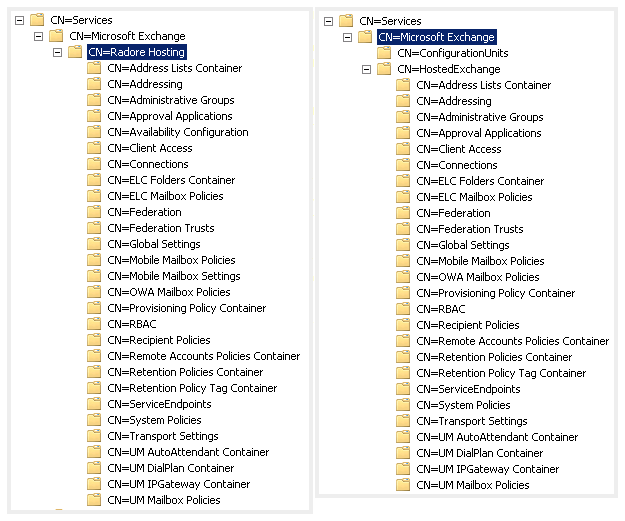
Do you see differences between Exchange Server 2010 and Hosted Exchange 2010? Yes, in the Hosted Exchange configuration, you see a new unit called ConfigurationUnits.
Btw, installation is going on well..

And finally, we finished our first server installation. Now we have a Hub Transport server.

I’ll do same thing to my second Hub Transport server. After installation, I’ll will make them load balanced servers. I’ll show how to load balanced them later.
Next, I’ll start setup of CAS and Mailbox Server. As I said, they will on the same server because I don’t have so many resources. Also as you know, much servers means much license prices. I use CMD again for the installation. But before the installation, install required updates.
You don’t need to reboot your server after updates.
If you don’t install required updates, Exchange setup fails.
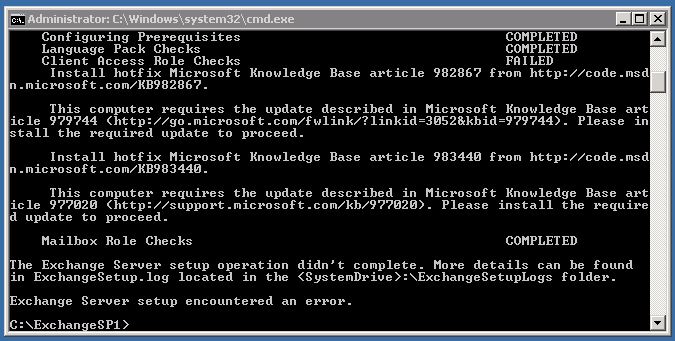
Start installation:
setup.com /mode:install /role:CA,MB,MT /organizationName:HostedExchange /hosting |
setup.com /mode:install /role:CA,MB,MT /organizationName:HostedExchange /hosting 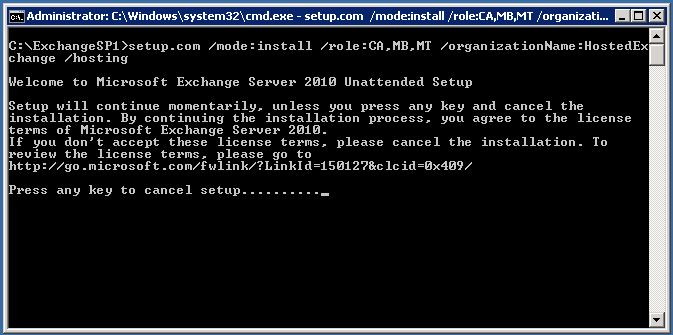
If you installed all required features, then setup would finish without errors.

After setup completed, you have to reboot your server.
Now go to second server and do same processes to other CAS + Mailbox Server.
If you finish installation of second server, we can continue with configuration of our Hosted Exchange environment.
I’ll post configuration of Hosted Exchange 2010 at the second part. We completed our Part 1.
Please continue with Part 2:
Hosted Exchange 2010 – Hosted Exchange 2010 Installation

Posted in Windows Server | 2 Comments | 34,431 views | 26/08/2010 15:17
If every times you are logging as temporary user to Windows Server 2008 R2, you can do a registry trick to solve this problem. Run regedit.exe and navigate here:
HKEY_LOCAL_MACHINE\SOFTWARE\Microsoft\Windows NT\CurrentVersion\ProfileList
You should see two entry as and .bak. Also check their home folder paths. If you are sure that .bak is your real profile, just delete the and rename .bak as . Then logoff. The next new logon will be your real desktop profile.
|


